Choc Chip Cookie Brownie Cake

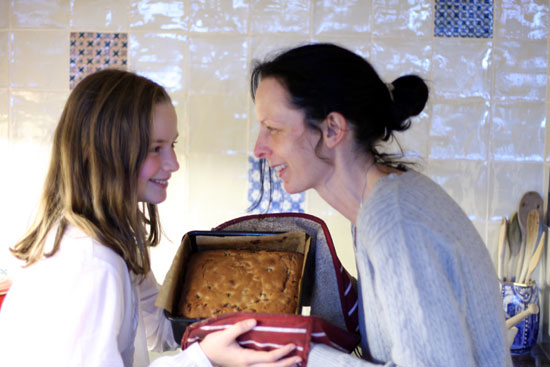
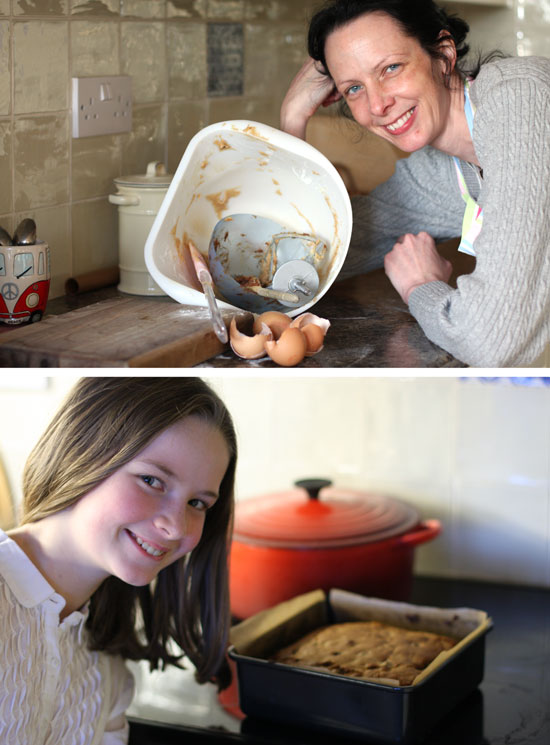
Five years ago today, I wrote about rainbows and unicorns. That was when M was four years old, and the Rainbow Cake that I made for her birthday soon became one of my most visited posts on A Merrier World. Now, little M has just turned nine and the rainbows and unicorns have grown up into cookies and brownies.

vslice

And M herself is not so little now, either. Her ‘good toes and naughty toes’ have transformed into Junior Associate feet of The Royal Ballet School

balletchillout

But there is still plenty of time for dreams …

inthewings

… and choc chip cookie brownie cake.

cutslice

side

top

Choc Chip Cookie Brownie Cake

Cookie base
8 oz butter
5 1/2 oz golden castor sugar
6 oz light muscovado sugar
1 tsp vanilla extract
2 large eggs
13 oz strong white flour
1 tsp baking soda
1 tsp salt
12 oz choc chips

Brownie top
5 oz butter
9 oz castor sugar
3 oz cocoa powder
1/4 tsp salt
2 eggs
1/2 tsp vanilla extract
2 1/2 oz plain flour

Preheat the oven to 180 degrees C.

Grease and baseline a circular 9″ springform pan.

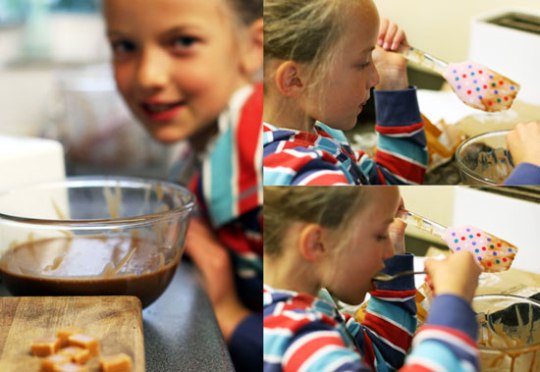
To make the cookie base, cream the butter and sugar. Add the vanilla and eggs gradually, beating to incorporate. Mix together the dry ingredients then stir into the dough. Stir in the choc chips.

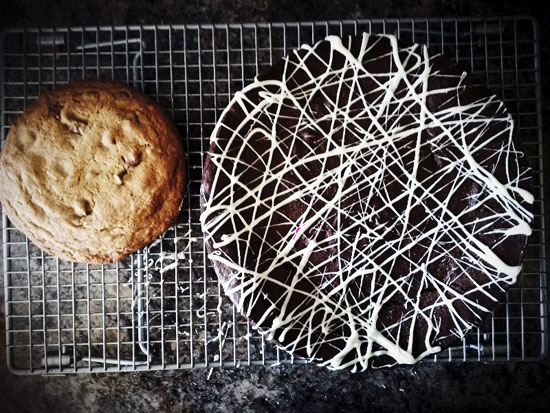
Press the cookie dough into the base of the prepared pan (I filled it to about 1/3 full and used the leftover dough to make a giant cookie, about the size of my hand …)

Put the pan in the fridge while you prepare the brownie batter.

To make the brownie topping, melt the butter, sugar, cocoa and salt together in a bowl over a pan of hot water. It will look like it’s never going to come together, but it does …

Remove the bowl from the heat and stir in the eggs, one at a time. Stir in the vanilla.

Fold in the flour, then give the batter a good stir for about 5 seconds to strengthen it a little (there isn’t much flour in the recipe, so it’s okay to develop a bit of gluten to give the brownie some structure).

Remove the springform pan from the fridge and pour the brownie batter on top of the cookie dough. Level the top.

Bake in the centre of the oven for 30 to 35 minutes.

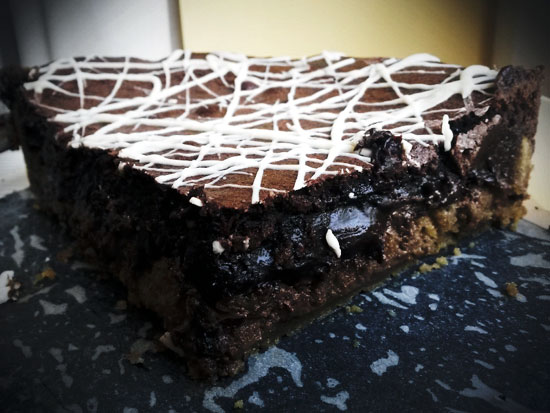
Cool for 10 minutes in the pan, then loosen the sides and remove the springform ring.

Cool completely (I left the cake on the base of the pan because I didn’t want to risk losing the whole thing if it collapsed while I tried to unstick it … nobody seemed to mind and it made it easier to carry to M’s ballet class!).

Melt some white chocolate and use a fork to drizzle over the top in a pretty pattern.

Me, You and the Cake

meyouandthecake

Mum: How come you get to come first in the title?

L: Because I’m awesome.

Mum: And I am …?

L: Do you really want me to answer that?

Mum: Hmmm. Perhaps not.

L: Anyway, you should be asking how come the cake comes last. It’s the most important thing here.

Mum: Aaahhh …

fruitcake

Here’s the story. Yesterday, I decided to clear out my baking cupboard. I found … golden and flame raisins (left over from the Haroseth I made for a school Passover meal), cranberries (left over from something I definitely made to do with cranberries), dates (left over from a sticky toffee pudding I made for Boxing Day), apricots (left over from the jewelled rice we also ate on Boxing Day). These all went into a large casserole pan. The dried mango-that-went-out-of-date went into the bin.

I hunted around the kitchen and came up with three clementines, a lemon, a lime, a bottle of whisky and a bottle of sherry. I added the fruit juices and good glugs of alcohol to the pan. I stirred in some molasses sugar, light muscovado sugar, vegetable suet, cinnamon, ginger and mace, then put the whole pot in the oven for three hours.

Mincemeat!

Now … over to L for the rest of the story ….

Mum didn’t know what to do with all the mincemeat that was left over so I said, “I love mince pies, but I’ve had a lot of them lately. Maybe we could put them into something else I really love like… fruit cake! So that is how it came into being – ME! Mum said shed. No, that looks wrong. Try again. Mum said she’d (that’s better) make up a recipe if I took some photos. I told her she looked like she had a long neck like a giraffe in the jumper she was wearing, so she’d have to change if she wanted me to take any photos of her. Mum said she didn’t want photos of HER … she wanted photos of THE CAKE. I said whatevs and she went to change.

madewithlove

Ha mum, a photo of you!

So, I took a photo of Mum with some eggs …

eggs

… Mum mixing up some batter …

batter

… Mum with a pile of dirty dishes …

mwl

… and oh, look! There’s me!

Made with Love Fruitcake

3 1/2 oz unsalted butter
7 oz golden caster sugar
4 large eggs
10 1/2 oz self-raising flour
14 oz mincemeat

Preheat the oven to 180 degrees C.

Grease and line an 8″ square baking pan.

Cream the butter and sugar, then beat in the eggs. Fold in the flour and mincemeat until evenly combined.

Scrape the batter into the prepared pan and level the top.

Bake in the centre of the oven for 35 to 45 minutes until golden brown, risen and springy to touch.

Turn out and cool on a wire rack.

Serve as slices of cake with glasses of sherry … or with dollops of custard or ice cream for a pudding.

Sweet Salad Trifle

It is July, M is now 8 years old and the end of another school year is approaching. For the last few weeks, M has been busily writing in a large blue book that she brought home from school. It was all very secret … something was going on. It turned out that the something was a challenge M’s teachers had set the Year 3 pupils – to design and create “an invention”.

I had visions of wires, circuits, remote controls and wheels and planned instantly to hand over the supervision of the ‘create’ stage to my husband. But no, M had come up with something far more interesting 😉 … her invention was designed to fill a gap in the food market …

Sweet Salad Trifle

M would like to tell you about it:

On Fridays after school, Mum sometimes takes us to a sweetie shop in Exeter called Mr Simms. We each get £1 to spend but I never know what to choose. It is really very difficult to choose out of my favourite sweets.

When our teacher gave us a cross curricular challenge to invent something, I knew what to do. We were told to identify a gap in the market – an object which does not exist at the moment, but which would be very useful. We had to invent a solution by designing an object to fill this gap. I thought, “When I walk into Mr Simms’s, is there something missing?” The answer was yes. Mr Simms needs a sweet salad … something that holds all my favourite sweets.

I wanted to make it with chocolate, gummy bears, fudge, smarties and jelly. It would be very tasty!!

My first idea was to make a sweet salad with my favourite sweets in melted chocolate, so I found out how to melt chocolate.

How to melt chocolate

The problem was that when the melted chocolate cooled it went too hard. I wanted it runny and smooth so you could scoop it out with a spoon.

I thought of a solution. I needed to make a ganache.

 How to make ganache

Then I had another problem. It was quite hard to get everything in the right place. I wanted the sweets to be a surprise in the middle but they kept sinking to the bottom.

I wanted it to look more than just melted chocolate with things swimming around in it, so I had a second idea. I had this idea when I was watching my sister singing in Evensong in the Cathedral. Divine inspiration!! I decided to make a trifle sort of thing with different layers of sweets in a knickerbocker glory glass.

Planning the trifle

This is how you make it:

First you need to get a knickerbocker glory glass and put some pieces of cake in the bottom. Then drop some gummy bears on top of the cake. Make some raspberry jelly and pour this over the cake and gummy bears. You have to put the glasses in the fridge until the jelly has set.

Cake and jelly layers

Next you need to chop up some chocolate into very small pieces in a food processor. Then you put some cream and some light muscovado sugar in a pan and heat them together just until they begin to boil. Mum did this next bit because I didn’t want to burn myself. You turn the food processor on and slowly pour the hot cream through the spout thing in the lid until the chocolate has melted and the ganache is smooth. Scrape it out into a bowl.

Making ganache

When you have finished make sure nobody’s looking and lick the spatula you have just used to scrape the ganache out of the food processor with.

Tasting

Then you cut up some pieces of fudge into small pieces and put these on top of the jelly. Make sure that the ganache has cooled a bit or it will melt the jelly, then pour in into the glasses on top of the fudge. Put the glasses back in the fridge. When you are ready to serve the sweet salad trifles, take them out of the fridge and put some smarties in a pattern on the top.

Smarties on top

Here are some things that my friends said about my invention:

Alex said it looked nice. Georgina said that she liked the technique I used and that she liked the idea of different layers. Ruth said that I could make it better by putting more sweets in it! Martha said yum and Peter said he was speechless. Bea said COOL!!!

Mrs Housego said that it inspired her to make one for when her friends come round. Mr Yeo said, “That looks really tasty!”

When I tasted it, I decided that I could do it in a smaller glass or a bowl and use a bit less chocolate and gummy bears. I thought the cake and jelly were really nice.

And that is how you make a Sweet Salad Trifle 🙂

Kids in the Kitchen

No sooner had we packed the Hallowe’en box back into the shed for another year than T was clamouring for the Christmas box to be brought inside.

“We have to make the house all Christmassy,” he announced on the first of November. I wasn’t so sure that I wanted to be picking up endless strands of tinsel, blobs of cotton wool and sprinkled glitter for the next couple of months, but 5-year-olds unfortunately don’t have a great sense of time scales . We eventually settled on a less than amicable compromise to dig out the Christmas box as soon as we hit December. T is currently getting his own back by repeatedly singing ‘We wish you a merry Christmas’ at every opportunity. Lovely.

I wasn’t quite prepared however for how quickly November seems to be disappearing. Next week brings the turning on of the Christmas lights in Exeter, the school Christmas Fayre and only 30 shopping days left until jackpot. Regardless of the commercial pressure to start the build-up to Christmas as far in advance of the 25th December as possible (combined with the perhaps even greater pressure to do so coming from T), my diary is indeed careering uncontrollably out of its November pages.

My lack so far of a post in November is in no way indicative of the baking I have (or haven’t) been doing recently. In fact, I think I’ve attempted a greater range of  those out-of-your-comfort-zone sorts of recipes than I have ever done before in any given month. The only reason I haven’t blogged about them is because I’m sworn to secrecy. Seriously, the skies will split open and the hand of wrath will cast down fiery doomballs on me if I so much as let you peer through the glass in my oven door. You see, I’m having great fun testing recipes for Rose’s next book. But that means you’ll have to wait until it’s published before you too can taste the absolute sublimity of the recipes I’ve been baking. I can only promise you that it will be well worth the wait.

Of course, all of this also means that I haven’t had time to bake anything that I can actually talk about here on A Merrier World. BUT (and this is where the title of this post  finally comes into play) I confess to having turned my thoughts (perhaps hypocritically, considering my stance on T’s enthusiasm) towards baking for December’s holiday season as early as at the beginning of October …

Following the successful publication of my article on children’s lunchboxes in the North Devon and Exeter Families magazine, I contributed a second article for the November/December issue. This time, I waxed lyrical on a favourite topic of mine – kids in the kitchen.

I wrote about getting children involved in baking their own cookies to give away as festive gifts and included tips for helping children to achieve this as independently as possible. I also added a recipe for a basic chocolate cookie that can be used as a base for all sorts of imaginative extras.

I’ll stop prattling now and just give you the article instead. Hopefully, you won’t judge me too harshly for having brought this to you before we hit December …


In the Kitchen with Children

Everyone needs a festive cookie recipe up their sleeve, and what better way to celebrate the holiday season than to bake a special batch of cookies with your children for giving to friends and family? There are many varieties of cookies from oatmeal and fruit filled to mocha and peanut butter, but one of the most popular remains the simple chocolate chip cookie.

But don’t be fooled. A basic chocolate chip cookie recipe can be transformed into a truly seasonal treat  with a little imagination. Cranberries and pistachio nuts provide bursts of red and green, orange zest gives a festive aroma and white chocolate chips promise a scattering of snow.

Spend an afternoon baking with your children and they will be proud to parcel up their homemade treats to give away as presents (if you and they can resist the temptation to devour them all first, that is!).

Tips for Stress-Free Baking with Children

  • Supervise their handwashing before beginning to bake.
  • Collect together all the equipment you will need so that everything is close to hand.
  • Weigh out the ingredients in advance for younger children.
  • For older children, gather together all the ingredients they will need in advance but allow them to weigh out the amounts they need of each ingredient themselves.
  • Place each ingredient in an individual bowl (small plastic bowls work well for this) and ask your child to tell you what is in each bowl (my own children often confuse flour with sugar, for example).
  • Write out the recipe in a format that your child can understand. For younger children, this may use pictures and symbols; older children may be able to follow a simplified written version of the recipe.
  • Always use oven gloves when placing or removing baking trays from the oven.
  • Don’t be too worried by spillages or messy hands, but see them as a natural part of the baking process!
  • Don’t expect the finished cookies to be perfect – even the most badly misshaped cookies will still taste great!

Chocolate Chip Cookies

220g butter, softened
150g Fairtrade granulated sugar
170g Fairtrade light brown muscovado sugar
1 tsp vanilla extract
2 large eggs
360g plain flour
1 tsp baking soda
1 tsp salt
300g chocolate chips

Preheat the oven to 190 degrees C.

Cream the butter and sugar in a large bowl.

Lightly beat the eggs together with the vanilla and add gradually to the creamed mixture.

Mix together the dry ingredients, then stir into the dough until just combined.

Stir in the chocolate chips.

Drop large tablespoonfuls of the dough onto ungreased baking trays, leaving plenty of room for the cookies to expand during baking. Bake for 8-10 minutes in the pre-heated oven (9 minutes in my oven gives the best results for a crunchy-on-the-outside/soft-in-the-middle texture).

Remove the cookies carefully with a spatula and cool on wire racks.

Makes c. 30 cookies.

Seasonal colours variation: replace the plain/milk chocolate chips with 200g white chocolate chips or chunks and also stir in 100g dried cranberries, 100g chopped pistachios and the grated zest of 1 orange.

The Wooden Spoon Adventures

Let’s all sing …

Happy 5th Blogiversary to A Merrier World,
Happy 5th Blogiversary …

Hmmm. Maybe not. It doesn’t quite scan, does it?

But it really is my blog’s 5th birthday (despite the fact that the Choc Chip Cookie Brownie Cake above has seven candles. I was never very good with numbers).

Five years ago today, I clicked ‘publish’ for the first time and held my breath as my chocolate brownie tentatively announced my new, official status of ‘food blogger.’ Since that day, I have discovered friendships among an online crowd of passionate food bloggers and bakers, I have entertained Rose Levy Beranbaum and her assistant, Woody Woolston at home and abroad, and even conjured up a surprise at Dart’s Farm for two of my most loyal readers over the years, Melinda and Jeannette. My Great Pumpkin Cake seems to have spread far and wide across the internet whilst my Rainbow Cake and Unicorns post has inspired other Mums looking for party ideas for their young children. And WordPress tells me that this is my 150th post (gosh, how did that happen? A nice round, significant number like that? 😉 )

To celebrate this milestone (and five years is not so very short a time in terms of internet history), I’m sending a wooden spoon off into the big wide world to stir up some trouble.

Here’s the plan …

A few weeks ago, I snail-mailed a wooden spoon to one of my first-ever blog readers, Melinda. She had very generously agreed to come out of blogging retirement to write a post on her own blog about the adventures this wooden spoon would have with her when she used it to bake a tasty, local treat. She had also agreed to hound down, pester, cajole or bribe another willing food blogger to accept this wooden spoon afterwards and to take it on a further baking spree.

True to her word (for which I will be forever grateful), Melinda has introduced my wooden spoon to the delights of a Lemon Blueberry Buckle, nostalgically reminiscent of her roots in Oregon. She has also coined a new word – spoonee. Thank you, Melinda, for being such a wonderful first spoonee!  Next stop, Portland …

And so the wooden spoon’s adventures will hopefully continue, passing from baker to baker around the globe and whipping up a storm of regional specialities.

If all goes well, I will chart the Wooden Spoon’s Adventures here on A Merrier World by building up a page of links to all the delicious recipes the spoon has met on its culinary travels.

As for the lavishly-named, seven-candled Choc Chip Cookie Brownie Cake … here’s the recipe as a special birthday present from me to A Merrier World and its readers 🙂 .

Choc Chip Cookie Brownie Cake

Cookie Base
3 oz butter
2 oz caster sugar
2 1/2 oz light muscovado sugar
1/2 tsp vanilla extract
1 medium egg
5 oz plain flour
1/4 tsp baking soda
1/4 tsp salt
5 oz chocolate chips

Cream the butter and sugars in a large mixing bowl.

Gradually beat in the vanilla and egg.

Stir in the flour, baking soda and salt.

Stir in the chocolate chips.

Spread the cookie dough in the base of a 9″ springform pan. Put in the fridge while making the brownie batter.

Brownie
3 oz plain flour
1/2 tsp salt
1 tbsp cocoa powder
5 1/2 oz plain chocolate
4 oz butter
1/4 tsp coffee granules
5 oz caster sugar
2 oz light muscovado sugar
2 large eggs
1 egg yolk
1 tsp vanilla extract

Preheat the oven to 180 degrees C.

Whisk together the flour, salt and cocoa powder. Set aside.

Melt the chocolate and butter together in a bowl over a pan of hot water. Stir in the coffee granules.

Turn off the heat and whisk in the caster and muscovado sugars until completely combined.

Take the bowl off the pan of hot water and whisk in 1 egg, the egg yolk and vanilla.

Whisk in the second egg, but be careful not to overbeat at this stage.

Sprinkle the flour mixture over the top and fold in with a spatula.

Pour the brownie batter over the chilled cookie base.

Bake for 25 minutes until the brownie is just setting. Leave to cool completely on a wire rack.