Caledonia

Hello friends! A long time has passed since my last post, and my children are now all teenagers …… and L will celebrate her 18th birthday when she wakes up in the morning! Before she wakes, I want to share with you a beautiful recording that she made in lockdown with her friends (all former or current choristers of Exeter Cathedral Choir). And then, when I have another spare moment after I’ve realised that she’s now a fully-grown adult in her own right, I’ll share the recipe I concocted for her 18th-birthday Pumpkin Pie!

First Arabesque Birthday Muffins

The two most important things in life are birthdays and ballet. But not in that order ….

Welcome to life according to M. Where once as a 4-year old she lived for rainbows and unicorns, she’s now 11 years old and her life (and therefore mine too!) revolves around ballet. As she writes on her ballet blog, First Arabesque …….

Small girl, big imagination.

So when it came to baking some birthday muffins, it was inevitable that ballet would find its way into the mixture.

It started with 4 oz of butter and 7 oz of caster sugar …

… which were creamed and then beaten together with 2 large eggs and 1 1/2 tsp of vanilla extract.

8 1/2 oz of plain flour was sifted with 2 tsp baking powder and 3/4 tsp salt, then stirred into the mixture alternatively with 120 ml of milk.

There was definitely no licking of fingers.

The mixture was spooned into 12 muffin cases ….

…. and baked at 180 degrees C for 30 minutes.

Although she is now 11 years old, I get the impression that she still believes a messy kitchen can be cleaned as if by magic …

The ballet company were invited over to decorate the muffins ….

…. and to sing Happy Birthday (which was only 3 months late, M’s actual birthday having been in June!)

A special request to anyone who has read this far ….. Please head over to M’s blog and say hello – it would make her day!

Non Sticky Hands Pizza Dough

My sister asked me for my pizza dough recipe a few days ago ….

We’re hoping to christen Jon’s pizza oven later this week (although not if the weather keeps up like this). I wonder if you might be able to jot down your pizza dough recipe for me, please?

So far, so good. But then she became quite specific ……

Please don’t just reply with “oh I don’t know, it’s different each time…a hand of this then say the magic word” …..!!!!

Uh oh.

I don’t use any magic words, but I don’t use any weights or measurements either. I just aim for a certain amount of stickiness. And that’s hardly a winning formula!

Perhaps the main selling point of my ‘recipe’ is that it doesn’t use any sophisticated mixing equipment and is entirely sticky-hands free.


I leave the dough to rise in an upside-down, draught-free, cake-carrying box until the gluten has developed and it has a soft, velvety texture with lots of stretchy bubbles (the magical part of having added as much water as possible to the dough).

Eh voilà.

This slideshow requires JavaScript.

I hope that helps, Little Sis’ …?!
xxx

Fashionably Late Christmas Cake

christmas cake

I have a bad cold and it makes me cross and grumpy and irritable. Unfortunately, I really can’t blame my laziness on this cold, no matter how much wool I pull over anybody’s facial features. I’ve had this cold for three days; I have been sitting on this post for two months. That’s an awful lot of unaccounted-for cold-free days ….

But hey, it’s the holiday season and who knows, perhaps I can make a fashionably late grand entrance to the party with this Christmas Cake. Especially if I tell you that this is no ordinary Christmas Cake. For this, my dear readers, is a diabetic-friendly Christmas Cake. An oxymoron? (and no, that is not a bright blue alcoholic cocktail, which for some strange reason is the first picture that always pops into my head when I hear that word). Cake and low-sugar can, and do, belong in the same sentence sometimes.

Back in November, I was invited to contribute a recipe for the Active Brokers Diabetes Cookbook. The plan was that this recipe book would be full of useful recipes for people living with diabetes, including health information and a series of sweet and savoury recipes that are easy to make at home.

Having grown up in a family where mealtimes had to take into account my Dad’s type 1 diabetes, the daily routines of carbohydrate monitoring and insulin injections have always been very familiar to me. Fortunately, medical advances have meant that my Dad can now take a more flexible approach to managing his diet than ever before. I was therefore especially interested in taking part in this project.

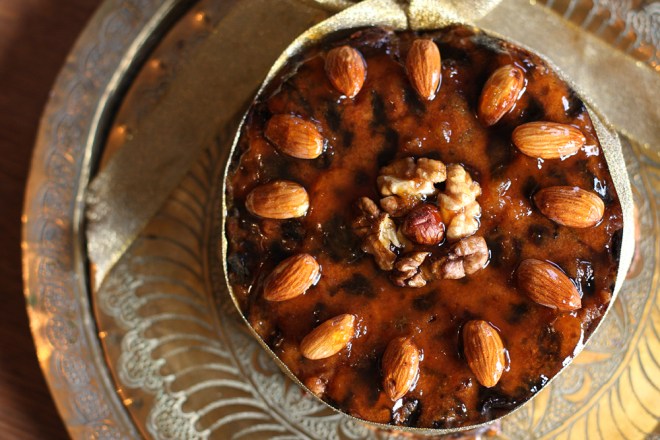
Knowing that Christmas was just around the corner, I thought that it would be fun to produce a festive recipe ………. all of which led to the creation of The Diabetic Christmas Cake. It is substantially lower in sugar and fat content than the traditional Christmas cake and has a deep, rich flavour. It can be kept for up to two weeks, or it can be frozen.

Perhaps I should rename it, ‘The Diabetic New Year Cake’ ….. or, ‘The Diabetic Cake You Wish You’d Had For Christmas’….. or ‘Next Year’s Diabetic Christmas Cake’ …? Miracles can be worked with a little rebranding 😉

The Diabetic Christmas Cake

125g (4 oz) unsweetened dried apple rings, roughly chopped
50g (2 oz) dried cherries
175g (6 oz) currants
125g (4 oz) dried apricots, roughly chopped
175g (6 oz) golden sultanas
5 tbsp (75 ml) brandy
250g (8 oz) half-fat spread
75g (3 oz) dark muscovado sugar
finely grated zest of 1 lemon
finely grated zest of 1 large orange
3 large eggs, beaten
1 tsp almond extract
250g (8 oz) self-raising wholemeal flour
pinch of salt
1 tsp ground mixed spice
1/4 tsp nutmeg, freshly grated
1/4 tsp ground ginger
2 tbsp (30 ml) skimmed milk
125g (4 oz) mixed nuts
3 tbsp (45 ml) reduced-sugar apricot jam

Mix together the apple, cherries, currants, apricots and sultanas in a large bowl and pour over the brandy. Cover and leave to soak for 12 hours or overnight.

Preheat the oven to 150 degrees C (300 degrees F).

Lightly grease a 20 cm (8-inch) round cake pan. Line the base and sides with a double layer of baking parchment. Wrap a folded length of brown paper around the outside of the tin and secure with string.

Place the half-fat spread and sugar in a large mixing bowl and beat until pale and fluffy. Add the lemon and orange zests and stir to combine. Gradually beat in the eggs and almond extract.

Stir the flour, salt and spices together with a whisk, then add to the mixing bowl. Fold in gently until thoroughly incorporated.

Fold in the soaked fruit and milk.

Spoon into the prepared cake tin and level the top. Decorate carefully with the mixed nuts.

Bake in the preheated oven for 2 to 2 1/2 hours until a skewer comes out clean when inserted into the centre of the cake (cover the surface lightly with tin foil towards the end of the baking time to prevent overbrowning).

Place the tin on a wire rack and leave the cake to cool slightly before turning it out and cooling completely on the rack. Carefully peel away the baking parchment.

To glaze the cake, warm the apricot jam until runny and brush over the nuts. The cake can be decorated with a wide coloured ribbon tied around the side.

Queen Rosie’s Royal Rose Cupcakes

I’d like to introduce you to a delightful 6-year old who will become my sister’s stepdaughter next year … (will that make me a step-aunty?). My sister is obviously failing to live up to the evil stepmother cliché but instead has been busy in the kitchen stirring up wonderful magic and regal surprises. Here’s the tale of Rose Fairy …

Rose Fairy writes letters to me. I make houses for her out of boxes and glitter. Lucy and I read a story called The Fairies Cupcake Ball (we borrowed the book from Kate, L, M and T) which is about a girl called Flossie and she dresses up when she’s cooking. Flossie and her Mum bake cakes for fairies. We chose the recipe for Queen Rosie’s Royal Rose Cupcakes because we were making them for my Rose Fairy.

01

We chose special ingredients to make the cake taste of rose and we decorated them.

02

Here’s me putting the decorations on the cakes.

03

This is the cake I decorated for Rose and her friends.

04

In the afternoon, I made a fairy house for Rose. I used a shoe box and made a bed and a bath for Rose. I used a match box for Rose’s bed. I made some perfume for her too. I used rose water and a drop of food colouring and put it in a tiny perfume bottle. Wainwright, the dog, got very messy because he got pink paint on his chin! My Dad loves clearing up glitter…especially when he gets all sparkly!!

05

06

The inside of the house

In the evening, I put the house outside before I went to bed. I left out the special cake for Rose. The next morning, Rose had left me a card and she’d eaten the cake with her friends. There were crumbs all around the house and in the friends’ bed!

07

This is what she did.

08

It’s really fun making houses and cakes for Rose.
Amazingly, my tooth fell out the following day so I was lucky enough to be visited by two fairies on two nights!

Queen Rosie’s Royal Rose Cupcakes

Ingredients

Cakes
115g sugar
115g softened butter
115g self-raising flour
2 eggs (we used medium organic)
½ teaspoon rose water

Icing
25g melted butter (only we forgot that bit and it worked out fine!)
400g icing sugar
4 tablespoons cold water
A few drops of natural pink food colouring

Finishing Touches (all bought from Cake Expectations)
Pink icing roses
Edible diamonds
Jelly roses

Method

Ask a grown-up to turn on the oven to 190 degrees C

Mix all the cake ingredients together really well.

Put 12 cupcake paper cases into a 12-hole fairy cake tin and spoon the mixture evenly between the cases.

Bake for 15 minutes and then ask a grown-up to place them carefully onto a wire rack to cool.

When cool, place all of the icing ingredients into a mixing bowl and mix them together for a few minutes. You might need some help with this because it’s really stiff.

We used a piping bag to swirl the icing onto the cakes but you can just use a warmed teaspoon if you don’t have the icing bag and nozzle.

The best bit is decorating the cakes – have fun!