Chocolate Chip Cookies

A few days ago, I read about how Joy of KnitsyBitsy had successfully used kate flour to make Peanut-Butter Chocolate-Kiss Cookies. Well, I never knew that cookies in the US were any different from cookies in the UK! What had I been missing out on all these years?

A quick bit of background reading brought up this information from Cooks Illustrated:

We tried unbleached and bleached flour to see which would yield the most tender cookie … After numerous tests, varying the type of flour, the proportion of flour to butter, and sifting and not sifting, we decided that the best cookie resulted from unsifted, bleached, all-purpose flour … Bleached flour, with less protein than unbleached flour, helps make the cookie crispy and crunchy on the outside and tender inside.”

Thick, crunchy and chewy chocolate chip cookies. Mmmm. And bleached flour was responsible for this?

Needless to say, I had to try it out with kate flour to see if it too would give these results. I don’t (yet 😉 ) own Rose Levy Beranbaum‘s book of cookie recipes, so I decided just to go with the recipe from Cook’s Illustrated that I found here (although as a side note, I have to say that I found these cookies too sugary for my taste).

I blasted 10 0z of plain flour in the microwave for a total of 6 minutes (stirring after each minute) until it reached 130 degrees C. I sieved the flour to remove any lumps and left it to cool to room temperature. I then used this flour in place of the bleached all-purpose flour called for in the recipe.

True to their word, these cookies were indeed crunchy on the outside and chewy inside. My daughters loved them! Guess what they had for breakfast this morning?

Thank you for setting me on to this with your Peanut-Butter Chocolate-Kiss cookies, Joy 🙂 .

Cookies

A Question of Flour

“Because it provides the fundamental functionality in a baked product, flour has the ability to either make or break a product.”

So writes Scott Heganbart in an article for Food Product Design. I have recently had a startling glimpse into the full significance of this deceptively simple statement.

Ever since my discovery of The Cake Bible by Rose Levy Beranbaum, I have been intrigued by this thing called ‘cake flour’. Until then, I had always assumed that flour was divided between plain (or all purpose) and self-raising, with a more macho variety of plain for breadmaking. But here was someone who had devoted a huge amount of time and energy ensuring that bakers in the UK could achieve the same results as those in the US using only the ingredients that were available to them … which didn’t include cake flour.

What then is cake flour? Beranbaum gives a detailed description of this ingredient in a section entitled ‘Understanding Butter Cakes’. From this, I learned that cake flour is low in protein because it is milled from soft winter wheat. It is also less acidic and able to absorb more water than other flours because it has a finer granulation and is bleached by chlorination. Apparently, the whole success of Beranbaum’s recipes for butter cakes relies on the structural advantages made possible by these properties of cake flour.

At first, I filed these differences away as a quirky curiosity and launched into following the UK-specific recipes. However, it soon became apparent to me that whilst tasting delicious, the butter cakes I was producing were not matching their descriptions. And then, one day, there was the disaster of the Golden Luxury Butter Cake. A velvety grain?? More like a soggy, dense lump of play-dough. Even the ducks were disdainful as they watched it sinking to the bottom of the pond.

What was going wrong? I decided to take a second look at this question of flour.

Back in 1992 when the UK edition of The Cake Bible was first published, self-raising flour in the UK was bleached. It was this bleaching process that allowed Beranbaum to create her solution of mixing plain and self-raising flour in recipes for butter cakes. Now, here comes the important part … I discovered that self-raising flour in the UK is no longer bleached. In fact, the Flour Advisory Bureau states that the process was not permitted after 1997. In other words, the work-arounds developed by Beranbaum have had the carpet swept from under their feet!

I’m not known for giving up easily. I wondered about the possibilities of obtaining cake flour from the US. However, there are now regulations about this that I suspect were not in place when Beranbaum suggested importing American ‘Softasilk’ cake flour as a possible solution to the problem in 1992. As reported in this United States Patent:

“Notwithstanding the acceptance in the United States of chlorinated cake flour, chemical treatments and chemical additives to foods have become suspect and it is desirable to avoid such treatments and additives wherever possible. In addition, most foreign countries prohibit the use of chlorinated cake flour in their cake products. As a result, these countries do not allow importation of American dry mix products such as cake mixes and the like which contain chlorinated flour.”

Sherlock Holmes taught, once you eliminate the impossible, whatever remains, no matter how improbable, must be the truth. Well, the only remaining course of action seemed to be to create my own alternative form of cake flour using processes and products available in the UK! I really wasn’t expecting to find any success along this route. After all, I have a flawed and very incomplete awareness of cake theory, little understanding of biochemistry or molecular science, and a kitchen full of children and their paintings rather than scientists and their laboratory equipment. Foolishly undaunted, I set out nevertheless to discover my own cake flour.

I needed something finely milled and low in protein. I found this in the Italian 00 grade flour that is widely available in UK supermarkets. At 9.9g of protein per 100g of flour, Doves Farm Organic speciality pasta flour was the most suitable that I could find (contrary to its claim to be high in protein, this flour is not only more finely milled but also has a lower protein content per 100g than all other brands of plain flour that I could find on the supermarket shelves).

Now I needed to apply an alternative treatment to chlorination that would yield similar results. After further research I came across a proposed method for the microwave treatment of unchlorinated cake flour:

“Microwave treatment of unchlorinated cake flour restores the ability of starch to gelatinize and swell … the swollen, gelatinized starch granules provide the honeycomb open-celled structure of the finished cake, which stabilizes it against collapse upon cooling. Starch gelatinization also contributes to crumb tenderness, slightly dry texture and development of fine-grained cells.”

It seemed too good to be true. Would this work in my own kitchen? Apparently, best results were obtained using flour with a protein content between 4% and 9%. My pasta flour was slightly above this at nearly 10%. Also, it appeared to be very important to use undehydrated flour so it has sufficient moisture to be able to interact with the microwave field and so reduce the moisture content to less than about 6%. My pasta flour? I really didn’t have a clue about its moisture content or whether it was already dehydrated or not. I could only cross my fingers!

Taking an enormous leap of faith, I set to work in the kitchen. I decided to bake two versions of Beranbaum’s Perfect All-American Chocolate Butter Cake. In the first, I followed the original US recipe and replaced the cake flour with my own microwaved flour. In the second, I followed the UK recipe and used McDougall’s Supreme Sponge flour. This is a self-raising flour milled specifically from soft wheats. The packaging claims that it can absorb more moisture and sugar than standard flour and will produce a very light, soft texture.

To make my own cake flour for the first version, I carefully weighed out 235g of pasta flour. I spread this on a plate to give a bed depth of 2cms and blasted it on high in the microwave for 1.5 minutes (half of my total alloted time of 3 mins). When I opened the door, a great amount of steam escaped from the microwave and the flour had started to clump together. I fluffed it up a bit with a fork and put it back in for its second blast. It then occurred to me that, with all this moisture evaporating, the finished flour might not weigh 235g anymore … so in my best scientific practice, I quickly spooned on a couple of extra tablespoons of flour and blasted this mix for the remaining 1.5 minutes! I now had a reserve of ‘cake flour’ that I could weigh out and sieve.

The results?

Despite having carefully researched and concocted my own version of cake flour, I had remarkably little faith that I could produce anything remotely edible with it. I certainly wasn’t anticipating the startling effect that my flour had made when the two cakes were out of the oven.

Cake Tops

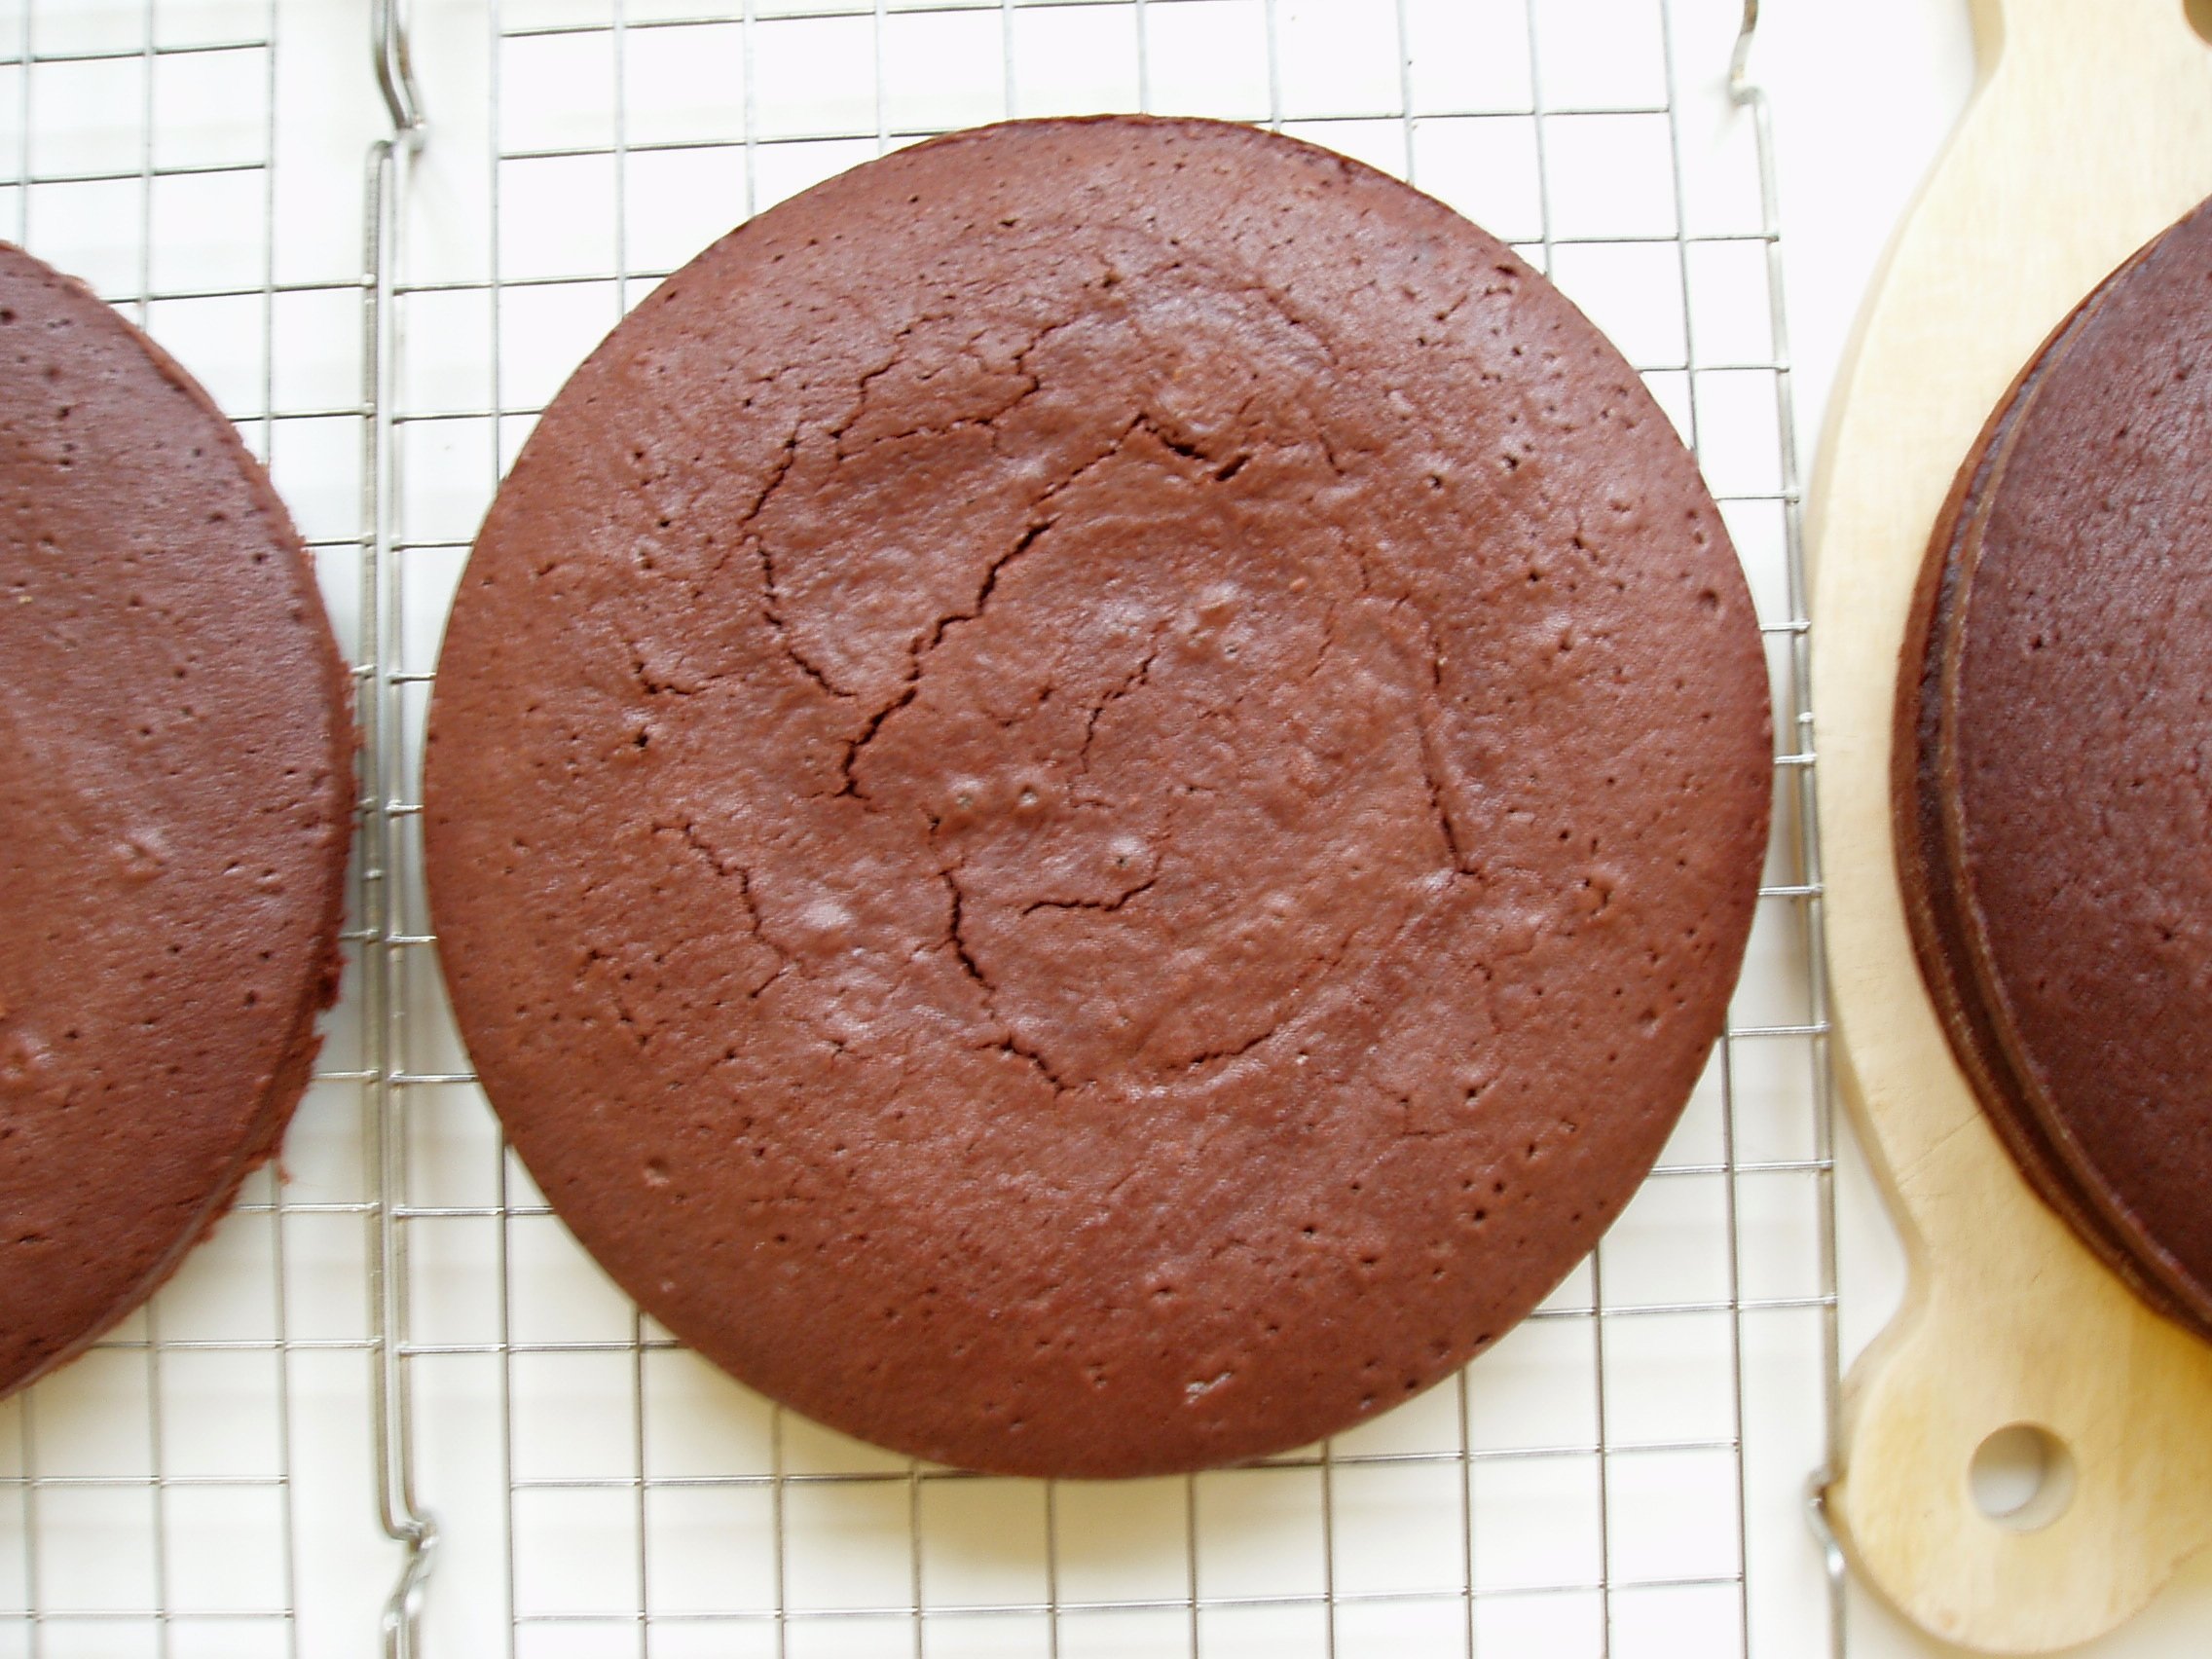
The cake layers (on the left and centre) made with the UK self-raising flour were good illustrations of what had happened so far every time I tried a butter cake recipe from The Cake Bible. They were bubbled on the top and dense inside. The cake layers made with my microwaved flour (cooled and stacked on the right) were beautiful! Smooth tops with a wonderfully light, fine texture inside. I was so excited!

Here are closer views of the layers:

UK-specific recipe with self-raising flour …

First close view of UK cake

and …

Second close view of UK cake

US recipe with microwaved flour

Close view of US cake

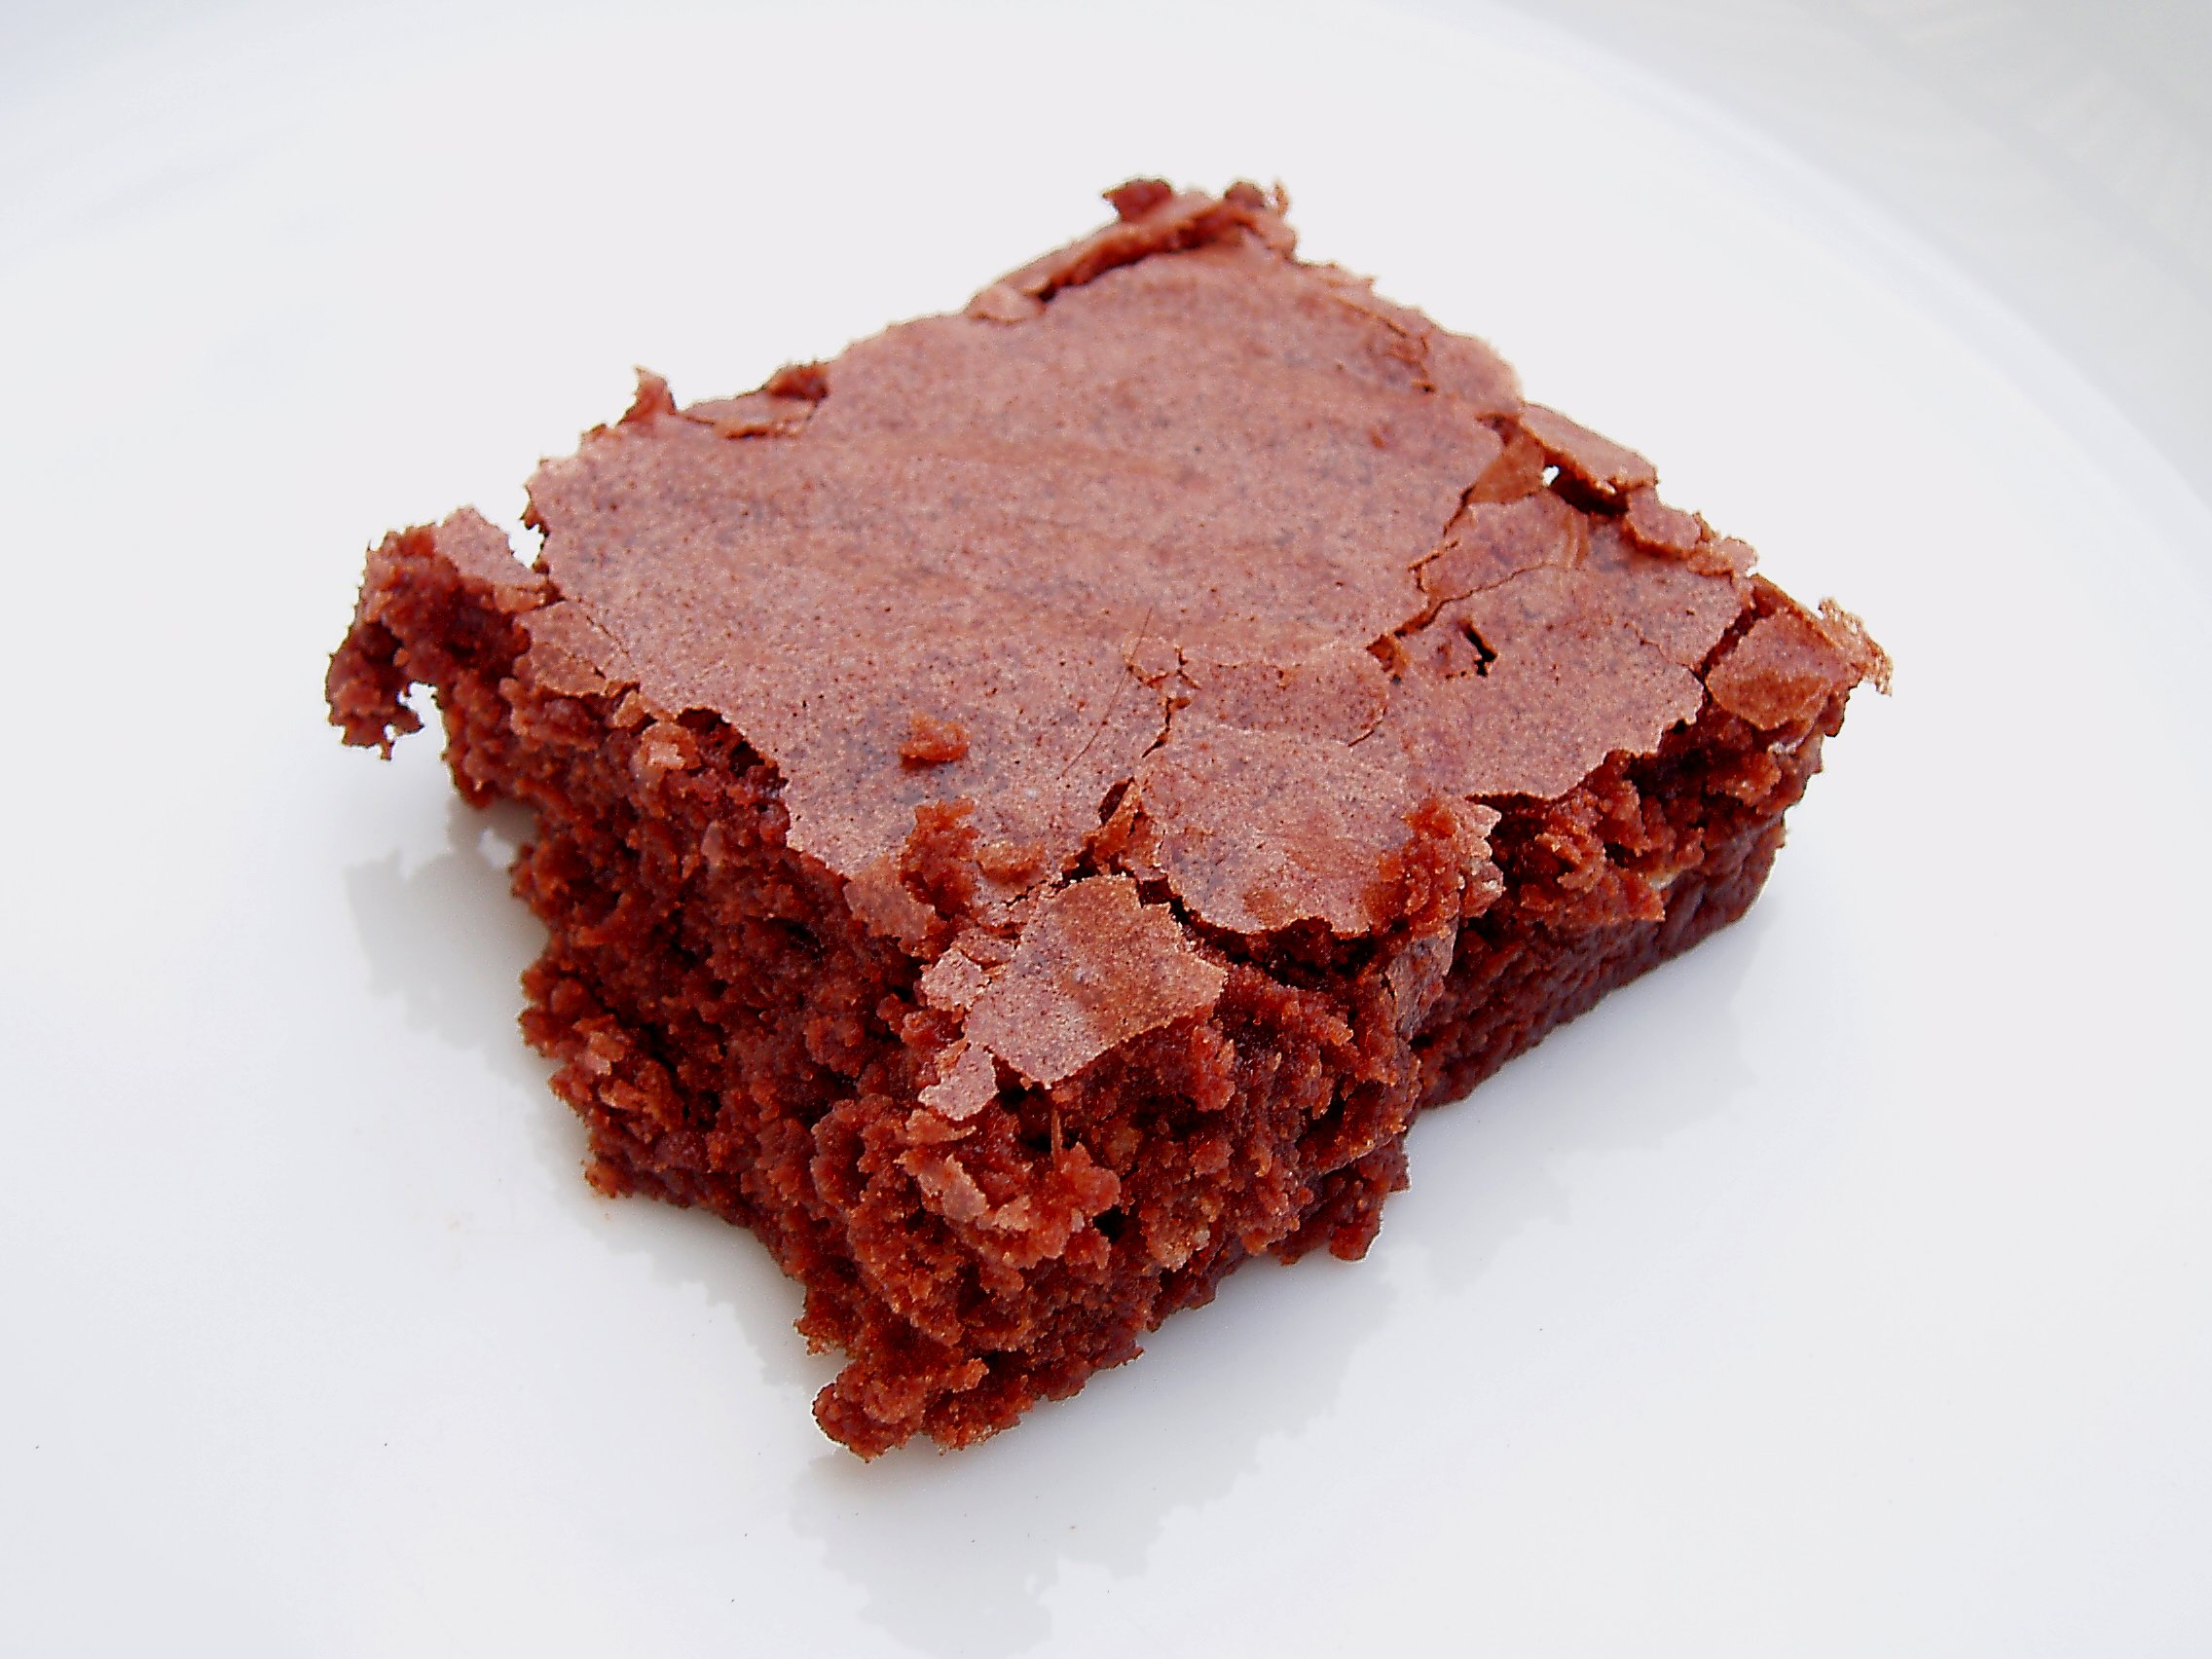
Not only did my microwaved flour have a dramatic effect on appearance, but it also had a comparable effect on the taste of the cake. The UK/self-raising flour version was quite delicious but also heavily moist and buttery. The US/microwaved flour version was quite another story – light, chocolatey, soft and exceptionally exquisite.

I can’t provide tasting samples online, but the difference is clear in this photo. The UK/self-raising flour cake is on the left in the foreground; the US/microwaved flour cake is behind.

Inside the cakes

The next day, the UK/self-raising flour cake seemed to have a buttery strip running through the centre of each layer whilst the US/microwaved flour version had retained its lightness. If anything, the US/microwaved flour cake had become even more meltingly chocolatey.

I can only say, “Mmmmmmm” as I now have something to think further about … and some delicious chocolate cake to eat as well!

Flavours of Côte d’Ivoire

My eye has recently been caught by R khooks’ Stop the Traffic Chocolate Competition in support of the campaign to stop the trafficking of children in the production of chocolate bars.

“Nearly half the world’s chocolate is made from cocoa grown in Cote d’Ivoire, West Africa.”

The 2000 US State Department Human Rights report said “It is estimated that some 15,000 Malian children work on Ivorian cocoa and coffee plantations. Many are under 12 years-of-age, sold into indentured servitude for $140, and work 12-hour days for $135 to $189 per year.”

Stop the Traffik Logo

STOP THE TRAFFIK is calling for consumers to force the chocolate companies to guarantee that their products do not use cocoa harvested by child slave labour on the farms in Côte d’Ivoire.

“The only way chocolate companies will take action is if they see their expected branded chocolate sales drop. The only way that we can stop the trafficking of children in the production of our chocolate bars is to change which ones we eat.”

I have to admit that, whilst being aware of Fairtrade chocolate, I’ve always (until now) stuck to my tried and tested favourites when it comes to actually buying chocolate. Fuelled by R khooks‘ challenge to raise awareness of the traffik free guarantee campaign by posting a recipe using fair trade/ethically sourced chocolate, I headed to my local Oxfam shop. It was there that I discovered Divine Chocolate, a Fairtrade chocolate company co-owned by the cocoa farmers cooperative, Kuapa Kokoo. I bought two 100g bars of plain chocolate and a smaller bar that I shared with my daughter on the way home.

Divine Chocolate

From the first taste, I was hooked. This chocolate is as smooth and glorious as the packaging claims it to be. Even M, my fussy 2-year-old, wanted more – commendation indeed as she normally finds plain chocolate to be too bitter for her taste.

Now I had a problem. The very quality of this chocolate stands for itself – how could I possibly improve on that? On the other hand, I didn’t think that …

‘Open wrapper. Eat’

… would count as a recipe for the purposes of the chocolate competition!

In my reading around the topic, I was struck by the fact that the majority of child labourers working on the cocoa plantations in Côte d’Ivoire have never tasted the end product of the beans they harvest.

“You eat the chocolate biscuits – you who have never seen a cacao tree. We pick the cocoa beans – we who have never tasted chocolate.” Bernard Guri, CAFOD partner, Ghana.

Rather than being a pure celebration of chocolate, my entry is therefore a recipe where the flavours of Côte d’Ivoire meet and unite.

Flavours of Côte d’Ivoire

Flavours of Côte d’Ivoire

2 ripe, large bananas
1/2 tbsp golden castor sugar
1/2 fresh mango
50g Fairtrade plain chocolate, coarsely chopped

1/4 cup shredded coconut

1 pineapple, diced
1 1/2 tbsp golden castor sugar
1/4 tsp white pepper
1/4 tsp grated nutmeg
1/2 tsp ground ginger
1/2 tsp ground cinnamon

Chocolate Sauce

50g Fairtrade plain chocolate
1/4 cup creamed coconut
2 tbsp golden castor sugar
2 tbsp palm syrup
1 tbsp groundnut oil
1/4 cup water

Peel and slice the bananas. Freeze until solid (at least an hour). Blend in food processor with sugar and mango until creamy. Stir in the chunks of coarsely chopped chocolate. Scrape into a tub and freeze.

Spread the shredded coconut on a baking tray and toast in a hot oven (200 degrees C/ 400 degrees F) until just browning. Set aside.

Peel the pineapple and slice into rounds. Cut each round in quarters. Place on a baking tray and sprinkle with a mix of sugar, pepper, nutmeg, ginger and cinnamon. Cook in a pre-heated oven 200 degrees C/ 400 degrees F for 10 minutes. Cool to lukewarm.

Melt all of the chocolate sauce ingredients together over a low heat, stirring until the sugar is dissolved and the sauce is smooth.

Serve the spiced-pineapple quarters in a bowl with a scoop of banana-chocolate ice-cream. Drizzle with chocolate sauce and scatter with toasted coconut.

Chocolate Snickerdoodles

The school bells ring, it’s back to the classroom today for the start of the Autumn term. Where has the summer gone? Are we really gathering in the playground once again, anticipating apple-bobbing, bonfires and Christmas parties?

L seemed happy enough this morning as she caught up with her schoolfriends. Her younger sister wasn’t quite so sure as she waved goodbye to her holiday playmate (which is surprising really, given the amount of squabbling the two of them have engaged in these last few weeks).

I thought it would cheer up M if we made some cookies together (M especially enjoys baking when she doesn’t have to share the mixing with her big sister). Also, I though it would be nice to have some freshly-baked cookies to feed a starving schoolgirl at the end of her first day back.

As it happened, I was right on both counts!

Chocolate Snickerdoodles

Chocolate Snickerdoodles

2 1/4 cups caster sugar
1 teaspoon ground cinnamon
1 teaspoon ground ginger
1 teaspoon ground cardamom
1/2 teaspoon mixed spice
1/2 teaspoon white pepper
1/2 cup cocoa powder
1 cup butter
2 eggs
2 teaspoons vanilla extract
2 1/4 cups plain/all-purpose flour
1 1/2 teaspoons baking powder

Preheat the oven to 180 degrees C/350 degrees F.

Mix together the sugar and spices, then set aside 1/2 cup from the mix for rolling the cookies in later. Add the cocoa to the remaining spiced sugar. Stir well to combine thoroughly and break up any lumps in the cocoa powder (this saves having to sieve the cocoa – a messy job).

Cream the butter and sugar. Add the cocoa/sugar mixture and beat until combined.

Beat in the eggs and vanilla.

Add the flour and baking powder, stirring until well blended.

Use a dessert spoon to scoop out walnut-sized balls. Roll these in the reserved spiced sugar, then place 2″ apart on an ungreased baking tray.

Bake in the centre of the oven for 10 to 15 minutes. Allow to cool slightly on the tray before transferring to a wire rack.

Peck is the Brownie Queen

I was looking forward to trying Paula Peck’s recipe for chocolate brownies, and I certainly wasn’t disappointed. Delicious and moist with a thin, crisp, shining crust, these are the brownies I’ve been searching for.

The original recipe (as do many – another debate entirely) calls for chopped walnuts, but I haven’t included nuts in any of the recipes I’ve tested. It isn’t that I object or have a strong opinion on whether or not a ‘true brownie’ should be anything more than just chocolatey. It’s just that my two chief tasters (L, soon to be 5 years old and M, who has just celebrated her second birthday) think nuts in brownies are “Yuk”. Who am I to argue?

Paula Peck’s Brownie

Paula Peck’s Chocolate Brownies
Adapted from The Art of Fine Baking

6oz plain/bittersweet chocolate
6oz butter
6 eggs
3 cups caster sugar
2 teaspoons vanilla extract
1 1/2 cups plain/all-purpose flour
1/2 teaspoon salt

Preheat the oven to 325 degrees F. Grease and line the bottom of an 11″x16″ cake pan.

Melt the chocolate and butter in a double boiler or bowl set over a saucepan of barely simmering water. Set aside to cool slightly.

Whisk the eggs and sugar together until fluffy. Don’t overbeat the mixture as this will cause the brownies to be dry and crumbly. Add the vanilla, then stir in the melted butter and chocolate.

Fold the flour and salt gently into the mixture until combined.

Pour into the prepared pan and bake for about 25 minutes, or until the top looks dry.

Cool in the pan on a wire rack before cutting into squares or bars.

  • Enter your email address to subscribe to this blog and receive notifications of new posts by email.

    Join 289 other subscribers
  • Seasonal Recipes

    candied peel

    baileys chocolate truffles

    gingerbread men

    mince pies

    fudge

    smarties cookies

  • Freshly Made

  • Categories

  • Favourite Feasts

  • Awards

    DMBLGIT Award
  • Archives

  • wordpress visitor counter
  • Adventures in food by Kate Coldrick from Woodbury in Devon.