Pony Mad Birthday

M decided several months ago that she was going to have a “horsie party” for her 3rd birthday yesterday. She even collected together my cake books and searched through them until she found the cake she wanted. Which cake did she choose? … a stable full of ponies from Debbie Brown‘s 50 Easy Party Cakes.

No pressure then!

Motherhood is an easy target for guilt. I have made four cakes from this book for my elder daughter and only one for M. Each cake I vow is my last at the time, but how could I possibly disappoint my pony-mad princess? And so I have spent many hours this week in a cloud of icing sugar, hands stained various pastel colours, swinging between utter despair and relief while the ponies heads eventually took shape and hung miraculously in midair, looking out of their flowery stable. My Mum, who has been staying with us this week, was a great source of encouragement … I mean, you can’t exactly go and buy a cake from the supermarket and pretend you’d never failed with your own when your Mum’s in the kitchen watching, can you? 😉

It was worth it though. M was so pleased and proud to show off her birthday cake to the three little friends who came to her ‘horsie party’ yesterday afternoon.

Happy Birthday … neigh!

Pony Stable Birthday Cake

Colour or Crumb

When Rose Levy Beranbaum wrote her UK version of The Cake Bible, self-raising flour in the UK was still bleached even although plain flour was untreated. The trusty Food Industries Manual suggests that this was purely because people wanted the colour of self-raising flour to be bright rather than because it was necessary for the success of the recipes they were using … which was fortuitous for Rose but perhaps helps explain why there was no apparent demand by home-bakers in the UK for a replacement to bleached flour when chlorination was prohibited in 2000.

The Food Industries Manual also states however:

Since chemically aerated goods are baked shortly after the dough has been made, there is no opportunity for the gluten to ‘ripen’ hence self-raising flours need to be weaker and to contain less proteinous material than bread flours.

Since starting out on my flour quest, it has been a source of great frustration to me that self-raising flour has a lower protein content than plain and 00 grade flours. McDougall’s Supreme Sponge flour with its finely-milled soft wheats and 8% protein content has been sitting, laughing mockingly at me on the shelf of every supermarket. Why couldn’t they just leave out the baking powder and let me have some of it ‘plain’ and unadulterated?

I wasn’t sure what would happen to the baking powder components if I microwaved this self-raising flour … would they be deactivated by the heat, or would they remain unaffected until there was sufficient moisture for a reaction? Was it single-acting or double-acting baking powder? Would it explode?! My head was already spinning and that was even before I delved into the chemical formulations!

Well, today I finally took the drastic step of nuking it regardless.

I would never have believed that the two cakes I made this afternoon used exactly the same starting flour and exactly the same recipe, and were baked under as near to exactly the same conditions as is possible in my kitchen … only the flour in one cake was given the kate-flour treatment whilst in the other it was used straight from the packet.

Self Raising Cake

Here’s the first – Rose’s Yellow Butter Cake recipe made with McDougall’s Supreme Self-Raising Sponge flour, untreated.

Here’s the same cake made with kate flour. I didn’t expect it to work. I almost forgot to take it out of the oven, I was so sure it would be a total flop … literally, as I’d gone for the US recipe and assumed that the flour was no longer self-raising after it had been microwaved. Instead, this cake has almost exactly the same vital statistics as a 9 x 1 1/2 inch cake made with authentic cake flour! (Info for Woody: height of batter in pan = 1.9 cms; 27 mins baking time; height at sides = 3.2 cms; height in middle = 4.2 cms).

The only thing … it seems you can either have cake-flour colour … or cake-flour crumb … but not both at once!

Colour or Crumb

Finding the X Factor

Anyone who has watched Rose’s presentation on flour for the NYU Experimental Cuisine Collaborative may have noticed a point during the event where Rose explained to Woody that some kate flour would be coming his way from the UK. Well, it arrived … and from there we started an exciting series of cross-Atlantic flour experiments.

A few weeks ago, Woody made 2 yellow butter cakes – one with bleached cake flour and the second with kate flour. On the same day, I also made 2 yellow butter cakes – one with kate flour from the same batch as the flour I mailed to Woody and the second with a freshly-made batch of kate flour. My cakes were pretty much the same as each other, which showed that kate flour stores … and, more importantly in terms of the testing, that Woody could be fairly sure that the cake he was making was representative of cakes made with kate flour in the UK. From Woody’s cakes therefore, we were able to directly compare the baking performance of side-by-side examples of cake and kate flour.

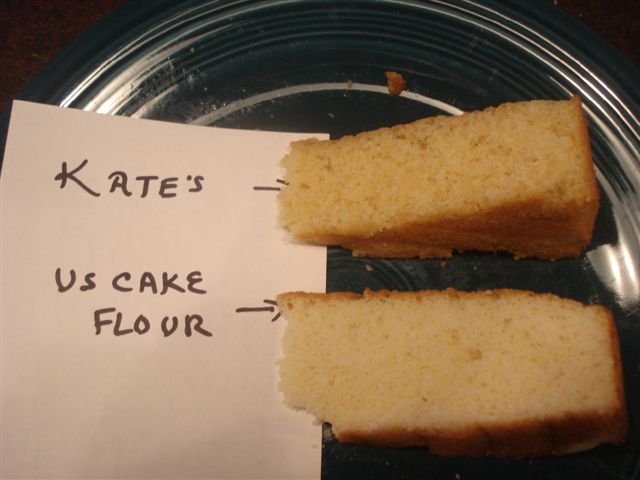
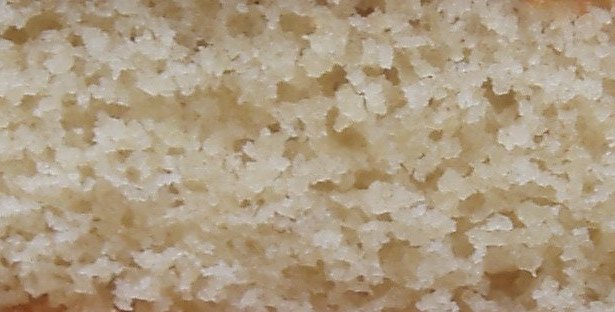
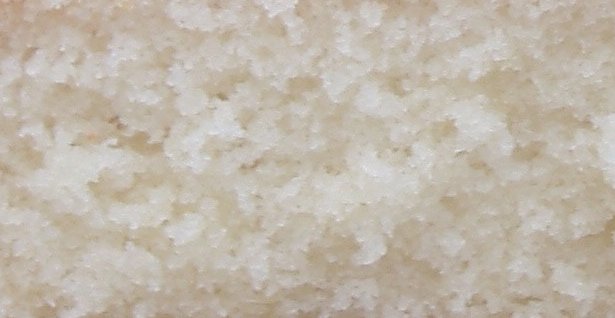
We saw that cakes made with kate flour are yellower and have a coarser grain than those made with cake flour. Woody also noticed a taste he described as “slightly popcorny” in the kate flour cake, which we ascribed to the flour’s heat-treatment in the microwave. Additionally, the cake-flour cake was higher at both the sides and in the centre than the kate-flour cake. Here’s one of Woody’s photos (with my grateful thanks to him for recording his testing in such detail 🙂 ):

Side by Side Slices

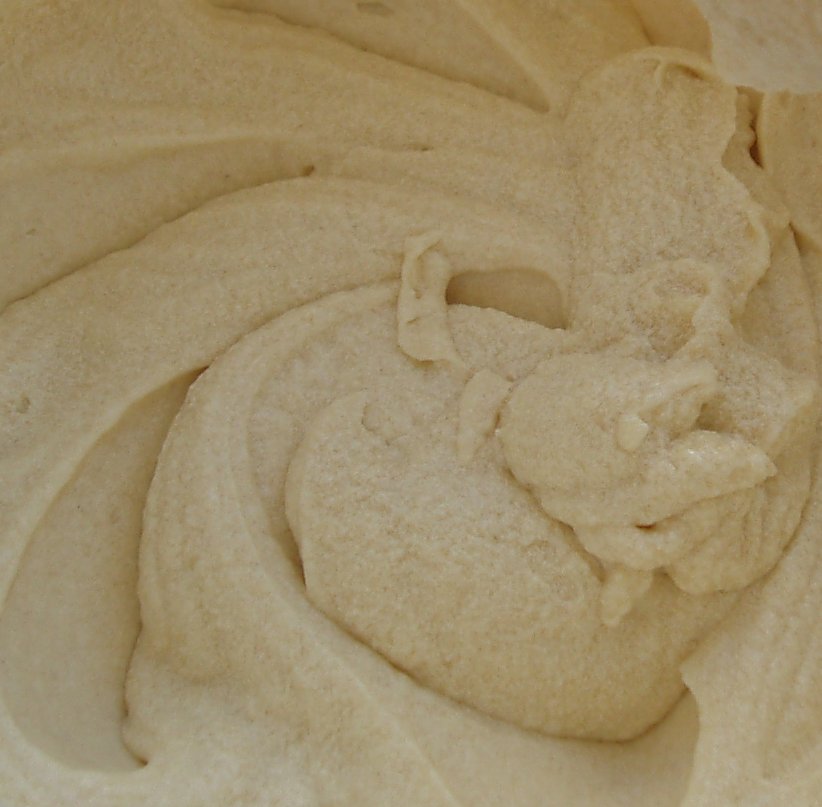
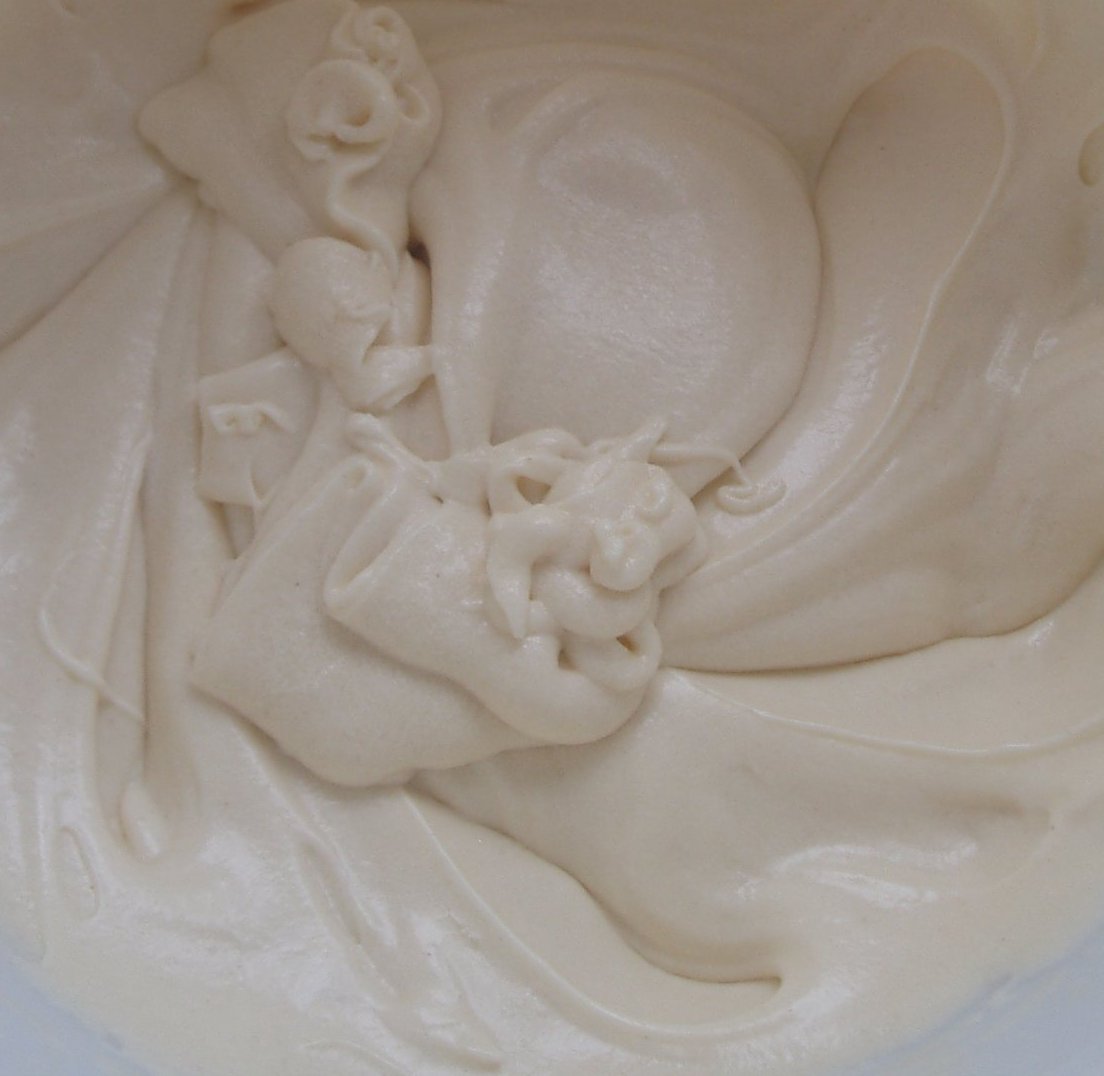
As a result of our cross-Atlantic flour experiments, I also had an opportunity to view and directly compare the batters produced by the two flours. Just as the finished crumb of the cake was coarser when using kate flour, so the batter appeared to be grainier and less gloopy than that of cake flour.

Cake flour batter …

Cake Flour Batter

… and kate flour batter …

Kate Flour Batter

Hmmm.

This was very interesting.

Both chlorination and heat-treatment of flour cause hydrophobicity of starch granules, which improves their oil binding ability and increases the stability of air bubbles in cake batter. It appears that chlorination induces this hydrophobicity through chemical changes, and heat-treatment through conformational changes to proteins on the surface of the starch granules (see this article by Masaharu Seguchi). However, it is likely that starch may be damaged during the microwave treatment of flour.

I discovered from the Food Industries Manual that cake flours need to be low in starch damage. This is because damaged starch granules have a greater affinity for water and can absorb more than twice their weight. Consequently, these starch granules have a lower capacity to bind water in a cake batter, which results in a lower viscosity.

The viscosity of batter is extremely important in defining the overall volume and texture of a cake. Heat from convection moves the batter and this flow has an effect on how the air bubbles incorporated in the batter disperse during baking. In batters with a high viscosity, the rate of gas diffusion is slowed so that air bubbles are encapsulated and retained. When hydrophobic starch granules are bound to the surface of these air bubbles through either chlorination or heat treatment, the bubbles are stabilized and expand uniformly. Cakes therefore have a high volume and fine, regular crumb grain.

In batters with a low viscosity, the convection flow is increased. Air bubbles rise quickly to the surface where they escape from the batter and are lost. Cakes therefore have a low volume and closed, irregular crumb grain.

Significantly, I also read in the Physico-chemical Aspects of Food Processing that it is the increased viscosity of batter made with treated flour that enables a lower amount of flour to be used in relation to sugar without risk of the cake collapsing. In other words, a higher viscosity is crucial to the success of high-ratio recipes. A reduction in flour is desirable because it decreases the starch content level of the cake and causes the crumb to have a softer texture than the crumb of a cake with a higher starch content.

It follows that any damage to starch during the microwave treatment of flour leads to a lowering in the viscosity of a cake batter made with this flour. Could this explain the differences I observed in the batters of cake and kate flour? Armed with a new set of key words, I headed once again for Google.

It turns out that in 1995, a group of cereal chemists from Kansas showed that the addition of xanthan gum to heat-treated flour increased the viscosity of batter and gave rise to an improvement in the volume and texture of cakes made with this flour. This is supported by findings two years earlier suggesting that the insensitivity of xanthan gum to temperature allowed batters to remain highly viscous for longer during baking. As a result, the batter could expand more before the structure of the cake set.

I also discovered a patent in which advantages were claimed for the addition of a non-flour fibre to heat-treated flour:

The addition of a non-flour fiber to the high ratio baking composition of the present invention is essential for obtaining baked volume, improved organoleptic properties and uniform cell structure.

The inventors used oat fibre. However, it is striking that xanthan gum is also a fibre source.

Xanthan gum is widely used as a substitute for gluten in gluten-free baking. I found a bottle of it in the ‘Free-From’ aisle of my local Tesco supermarket. Apparently, it is effective in relatively small amounts. The Kansas chemists recommended adding 0.12% of the weight of the batter in xanthan gum to the dry ingredients before mixing.

I discovered something further from this most recent research. As we had come to suspect, it seems that the crucial factor in heat treatment is the structural change to the starch granules, rather than the reduction in moisture levels per se. It is therefore both possible and beneficial to re-hydrate the flour after heat treatment:

After the heating is completed, the soft flour may be tempered to replace the moisture in the soft flour. Tempering is a process where the soft flour is spread out in a thin layer in a cabinet with humidity control and the flour absorbs moisture from the humidified air until the flour reaches the equilibrium moisture level.

Okay … I could do that!

This is what happened. I microwaved the flour in the usual way, being careful not to increase the temperature so quickly that the flour browned. In practice, this meant that I microwaved the flour in short bursts of no more than 30 seconds at a time. I then spread it out on a baking tray and popped it on the middle shelf in the (cold) oven. I boiled the kettle and filled a second baking tray on the bottom shelf with boiling water. I shut the oven door and waited while the water cooled. I then emptied the water-tray and refilled it a second time with boiling water. Door shut – flour in steam bath. When the flour had cooled, I sieved it. I used 4 1/4 oz of this flour + 1 oz cornflour + 1/4 tsp xanthan gum (kate x flour!) as a replacement for cake flour to make a 9″ x 1 1/2″ yellow cake.

Here is the batter:

kate x flour batter

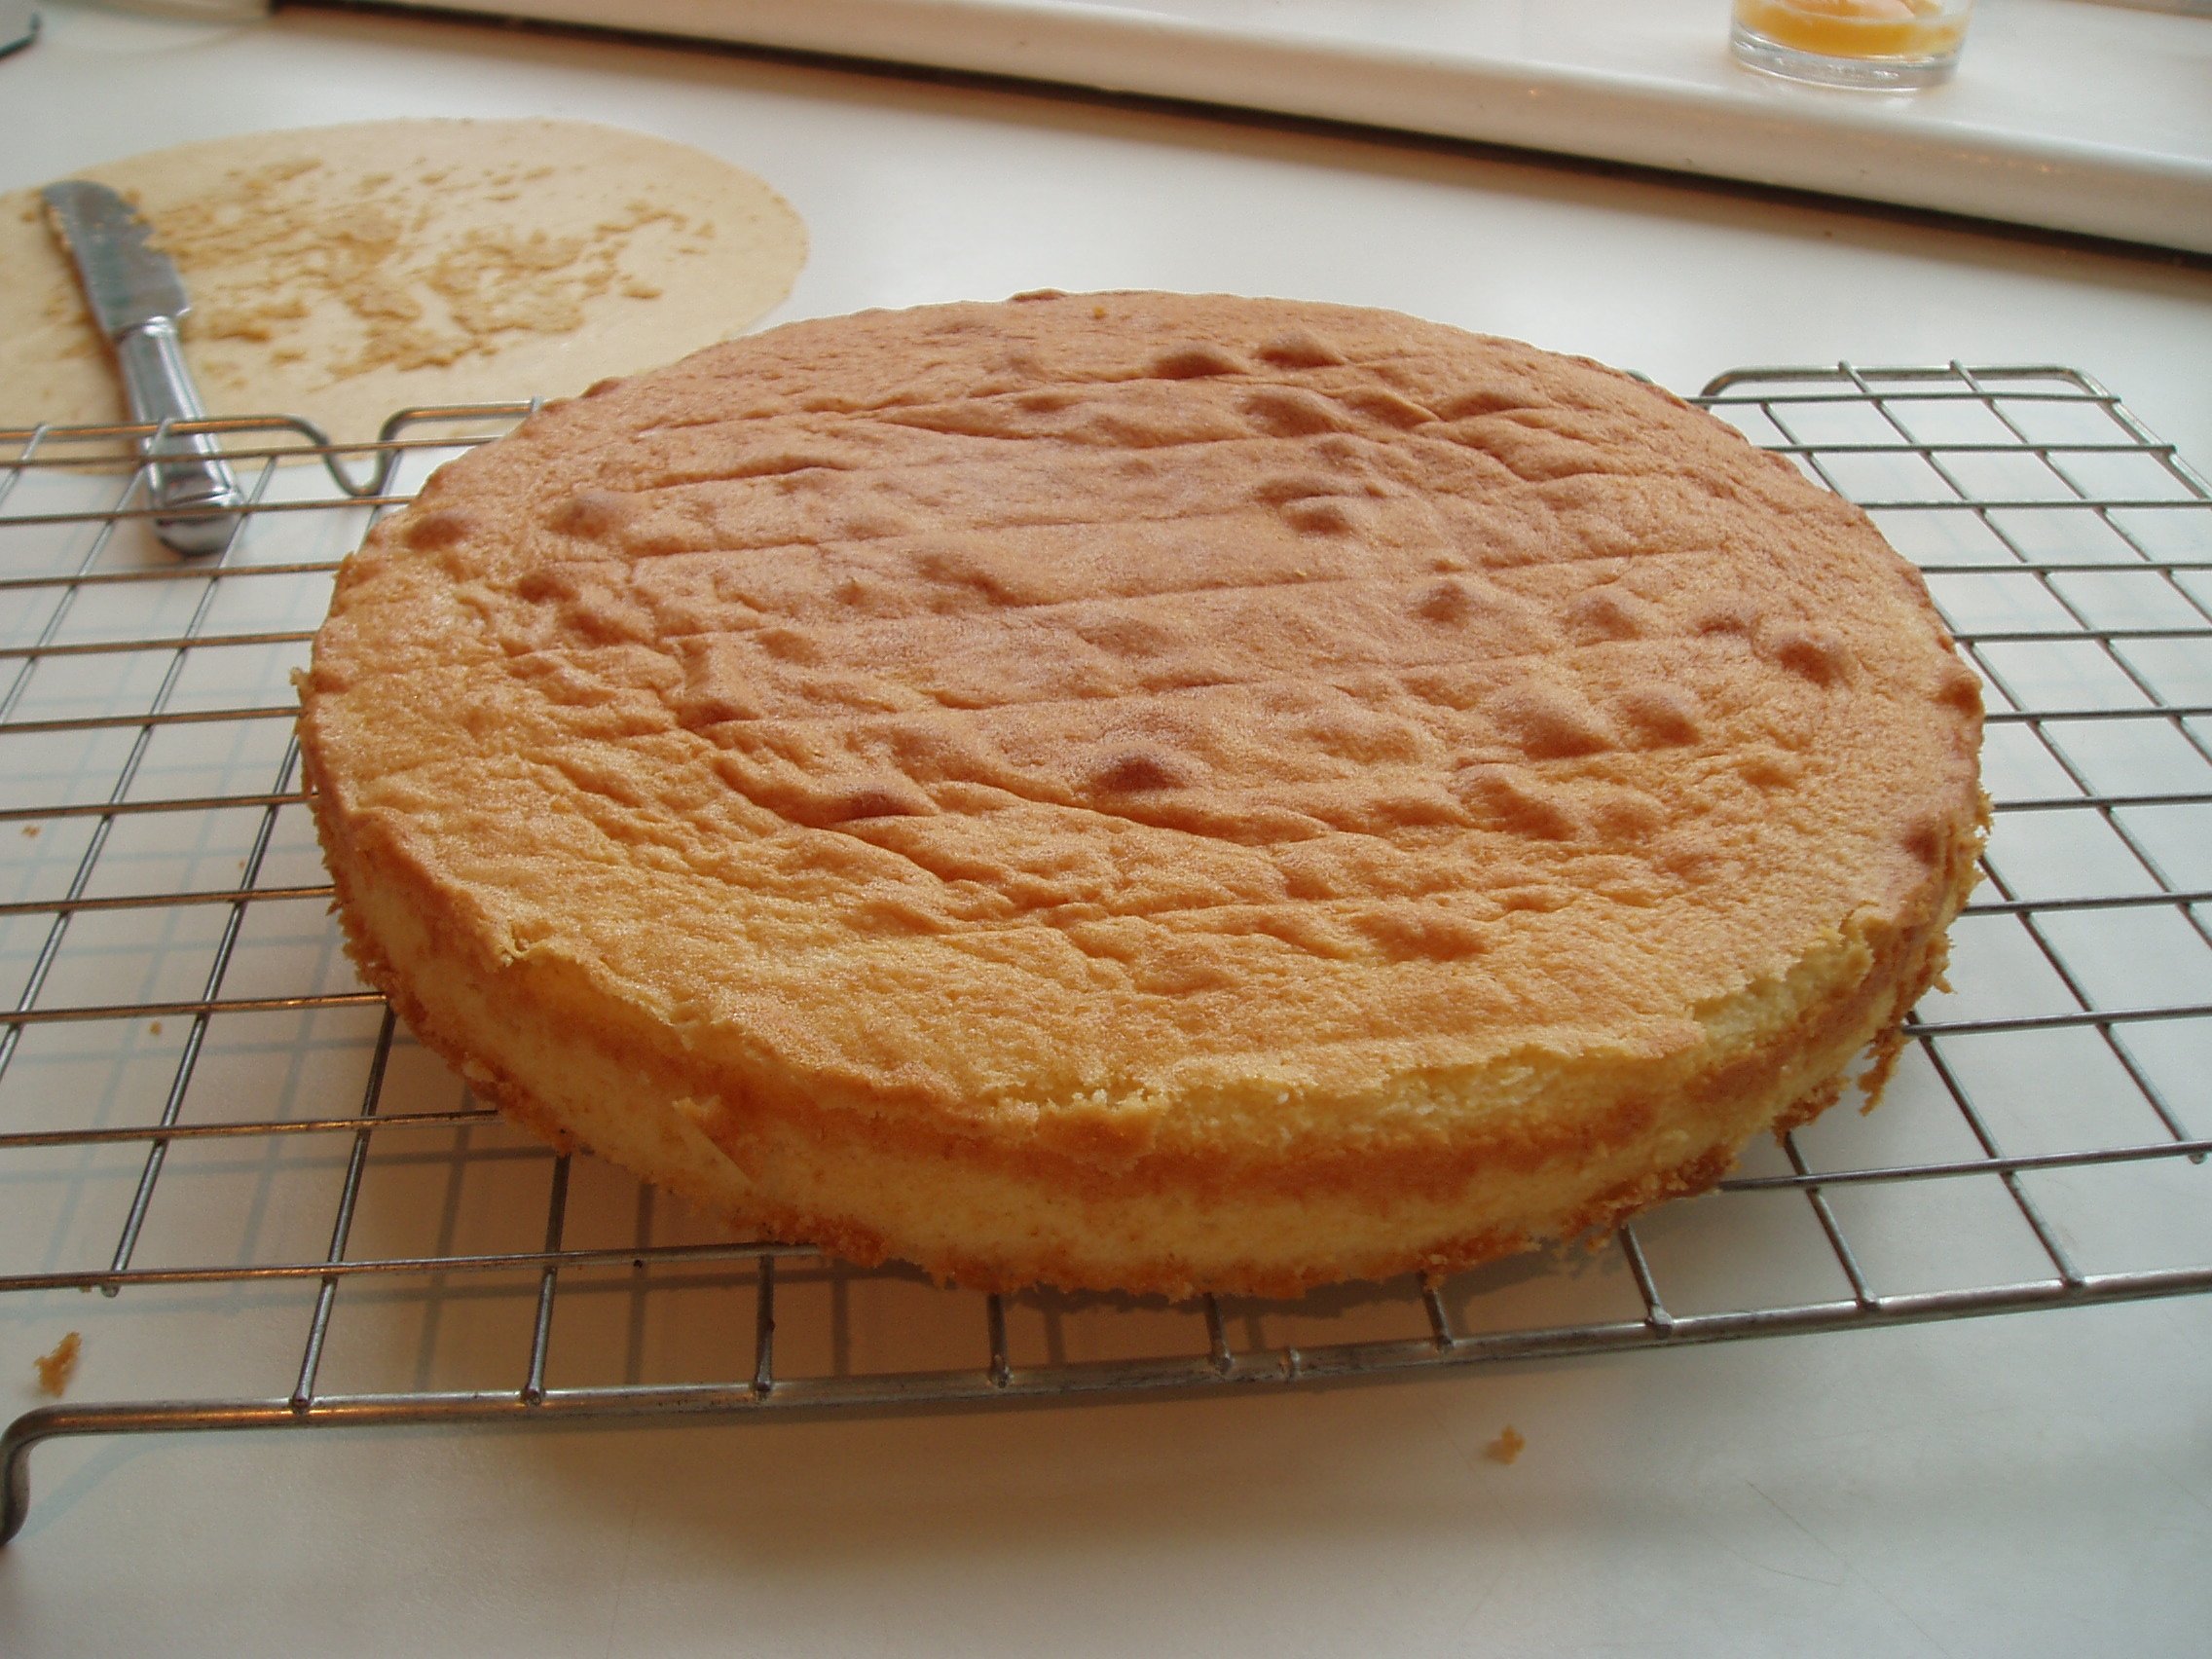
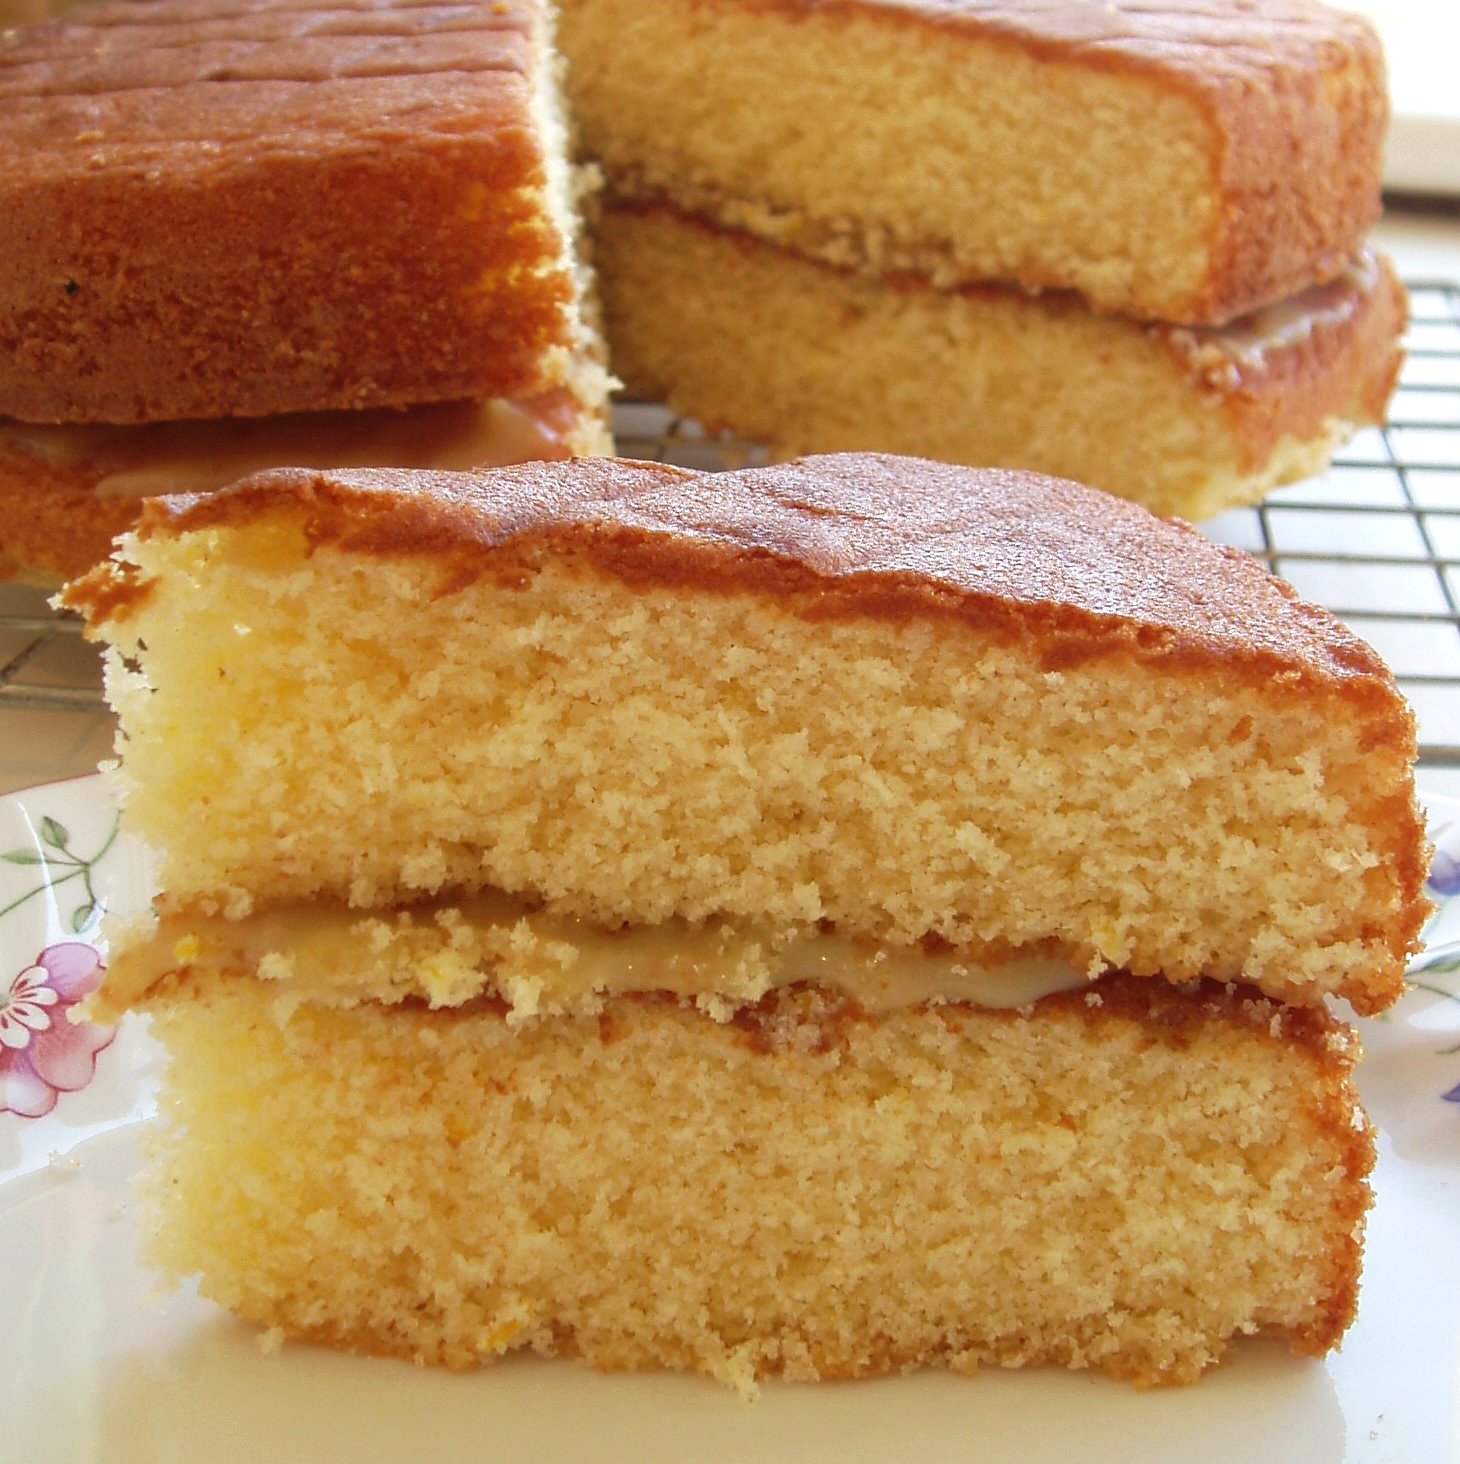
And here is the cake:

kate x flour cake

Closer views of the crumb of cakes made with cake flour …

cake flour crumb

… kate flour …

kate flour crumb

… and kate x flour …

kate x flour crumb

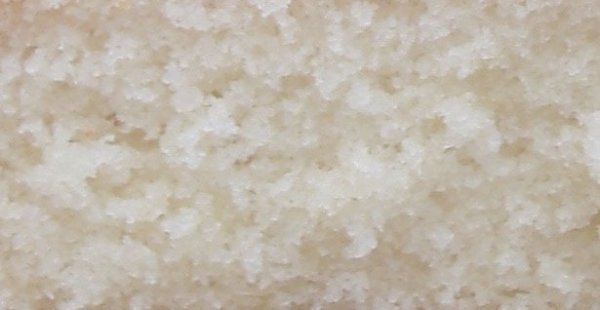
… suggest that we are heading in the right direction. Is xanathan gum the missing x-factor?

A Cake for Spring

Although my children and I have been hit by a resurgence of a nasty, child-borne sickness bug over this last week, and although I’ve been shivering in the cold rain and winds, it’s Easter today and Spring is certainly sprouting. I haven’t blogged or baked much for several weeks (more later, I’m sure, about how involved I’ve become with our local Pre School), but I couldn’t let this time of year pass by without any acknowledgment. And I also still need to fix a date with Melinda and Jeannette for April … and what better way to say hello again than to bake a cake for you both? 🙂

And so yesterday, I buffered myself with paracetamol and made Rose Levy Beranbaum’s Sour Cream Coffee Cake. With apples. And no coffee (it’s taken me a while to come to terms with this apparent misnomer, but I think I understand it now – it’s a cake to eat with coffee and not a cake made with coffee). My stroppy-but-gorgeous 2 1/2 year-old finally broke her sickness-induced fast to try some of this cake today when I took it to friends’ for dinner … and then she ate a second slice when we arrived home this afternoon. So far, I have only tried a thin sliver, but there’s a larger slice remaining for me if I feel any better tomorrow. And oh – it apparently pairs beautifully with a large dollop of Tate and Lyle’s Golden Syrup ice-cream (but there isn’t any of that left now, so I’m unable to comment!).

Sour Cream Coffee Cake

Lemon Cake and Cauliflower

I’m guilty of committing a bad scientific sin. I have a glorious cake sitting on my kitchen worktop and I have no way of knowing which of the variables I changed was responsible for its glory. Why? Because I changed all of the variables at the same time!

Was it because I increased the amount of cornflour I added to the flour? Was it because I microwaved the cornflour as well as the flour? Or was it because I had a craving for lemon cake and added some lemon juice, which is acidic?

I’m grateful to Adrian for his comments both here and on Rose’s blog – his observations and clear thinking prompted me to revisit the way in which I typically make up batches of ‘kate flour‘ and have resulted in a much easier and less messy method for its preparation. His questions have also lead me to try increasing the amount of starch so that the protein content of the flour/cornflour mix matches that of cake flour, as well as to introduce something acidic into the recipe to mimic an additional effect of chlorination on flour.

I can certainly confirm that these changes have all proved successful. My lemon cake is beautifully light, fine-textured, moist and well-risen. My sink and dish-cloths are also less clogged up with flour spillages, which is something that will please my husband. Whether or not these changes were all necessary … I really can’t say!

Lemon Cake

Lemon Butter Cake
Adapted from a recipe by Rose Levy Beranbaum

9 1/2 oz Italian 00 Grade flour (or plain flour)
2 1/2 oz cornflour
4 oz egg yolks (approx 6 egg yolks)
8 1/2 oz milk
2 1/4 teaspoons lemon juice
1 tablespoon grated lemon zest
10 1/2 oz castor sugar
1 tablespoon + 1 teaspoon baking powder
3/4 teaspoon salt
6 oz unsalted butter, softened

Grease, line and flour two 9″ x 1 1/2″ cake pans. Preheat the oven to 180 degrees C.

Place the flour and cornflour in a mixing bowl and whisk to combine. Put the mixture into a pyrex pie dish (not a bowl – the flour mix should be at an even depth of about 2cms). I’ve found that a pie dish is less messy than a plate when stirring the flour! Microwave the mixture at 750W for 4 to 5 minutes, stirring well at the end of each minute (I use a fork to fluff it all up and disturb any hot spots).

Remove the pie dish carefully from the microwave using oven gloves. Sieve and discard any residue. Set aside to cool further.

Combine the egg yolks, 2 oz of the milk, lemon juice and zest in a bowl. Set aside.

Weigh out 10 1/2 oz of the flour mix – any remaining flour can be discarded or used to flour your cake pans. Sieve the flour mix into a large mixing bowl and add the sugar, baking powder and salt. Mix slowly to combine.

Cut the butter up into small cubes and add to the dry ingredients. Add the remaining milk. Mix together slowly at first to moisten the dry ingredients, then beat for 1 1/2 minutes at medium speed (I go to no. 4 on my Kenwood).

Beat in the lemony-egg mixture in 3 batches, scraping down the sides of the bowl after each batch to make sure that all ingredients are combined.

Divide the batter between the two prepared cake pans and smooth with a spatula. Bake in the centre of the oven for 25 to 35 mins until the top is springy but the sides have not yet started to shrink. Cool on wire racks for 10 mins before removing the cakes from the pans.

What about the cauliflower? Well, we went to Dart’s Farm this morning and there in the entrance was a table stacked high with the most wonderful cauliflowers I have ever seen. And they were all grown locally in Budleigh. I don’t even really like eating cauliflower, but I couldn’t resist buying one of these beauties!

Cauliflower

  • Enter your email address to subscribe to this blog and receive notifications of new posts by email.

    Join 289 other subscribers
  • Seasonal Recipes

    candied peel

    baileys chocolate truffles

    gingerbread men

    mince pies

    fudge

    smarties cookies

  • Freshly Made

  • Categories

  • Favourite Feasts

  • Awards

    DMBLGIT Award
  • Archives

  • wordpress visitor counter
  • Adventures in food by Kate Coldrick from Woodbury in Devon.